Count what’s on your shelves, put a dollar value on it, and keep a record of every count. Stocktake uses the products and prices already in your FoodByUs account, so there’s nothing to retype.
- About Stocktake
- Before you start
- Step 1: Set up your Stock Items
- Step 2: Create a Stocktake Sheet
- Step 3: Do a stocktake
- Reviewing and editing past stocktakes
- Recording comps and wastage
- Who can do what: user permissions
- Troubleshooting & FAQs
About Stocktake
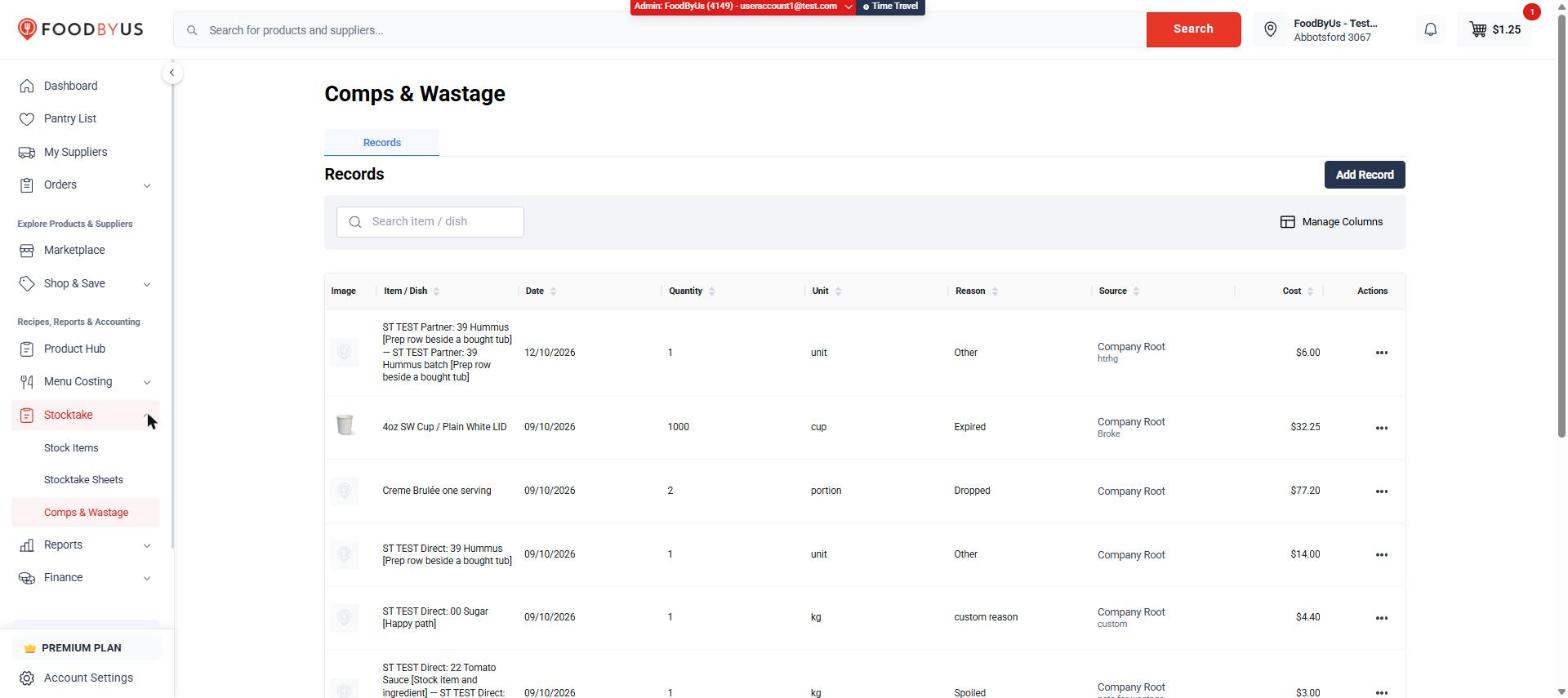
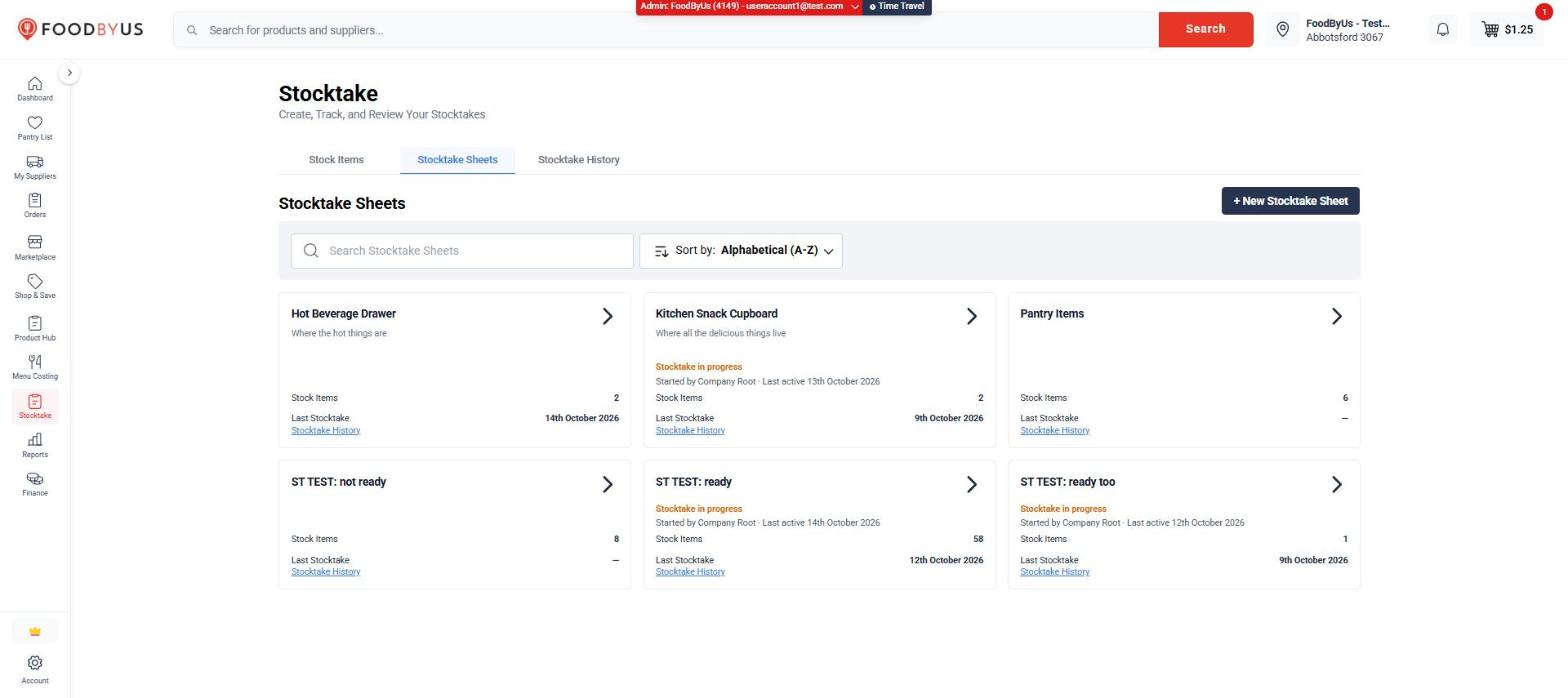
Stocktake is made up of four parts. Open Stocktake in the left-hand menu and you’ll find Stock Items, Stocktake Sheets and Comps & Wastage underneath it. Stocktake History is a tab on the Stocktake page.
| Where | What it’s for |
|---|---|
| Stock Items | The things you count. Each one comes from an item in your Product Hub. |
| Stocktake Sheets | Your counting lists, for example “Cool Room”, “Dry Store” or “Bar Fridge”. A sheet is a named group of Stock Items. |
| Stocktake History | A record of every completed stocktake, with who counted it and the total value. |
| Comps & Wastage | A log of stock that was thrown away, dropped, given away or eaten by staff between counts, with its dollar cost. |
How the pieces fit together
- Your Product Hub groups the products you buy into items (for example, “Bacon” might include products from two suppliers).
- You turn an item into a Stock Item by choosing the unit you count it in.
- You add Stock Items to a Stocktake Sheet.
- You start a stocktake on that sheet, enter your quantities, and complete it. The count is saved to Stocktake History.
Before you start
- Stocktake is available on the Premium plan.
- You’ll see Stocktake in the left-hand menu, with Stock Items, Stocktake Sheets and Comps & Wastage underneath, once it’s switched on for your account. If you can’t see it, contact our support team.
- Your account’s user role controls what you can do. Setting up Stock Items and creating sheets needs a manager-level role. If a button is greyed out or missing, ask your account owner to check your permissions.
Step 1: Set up your Stock Items
A Stock Item is an item from your Product Hub that you’ve chosen to count. You don’t create Stock Items from scratch: if an item isn’t in your Product Hub yet, add it there first.
See which items are ready
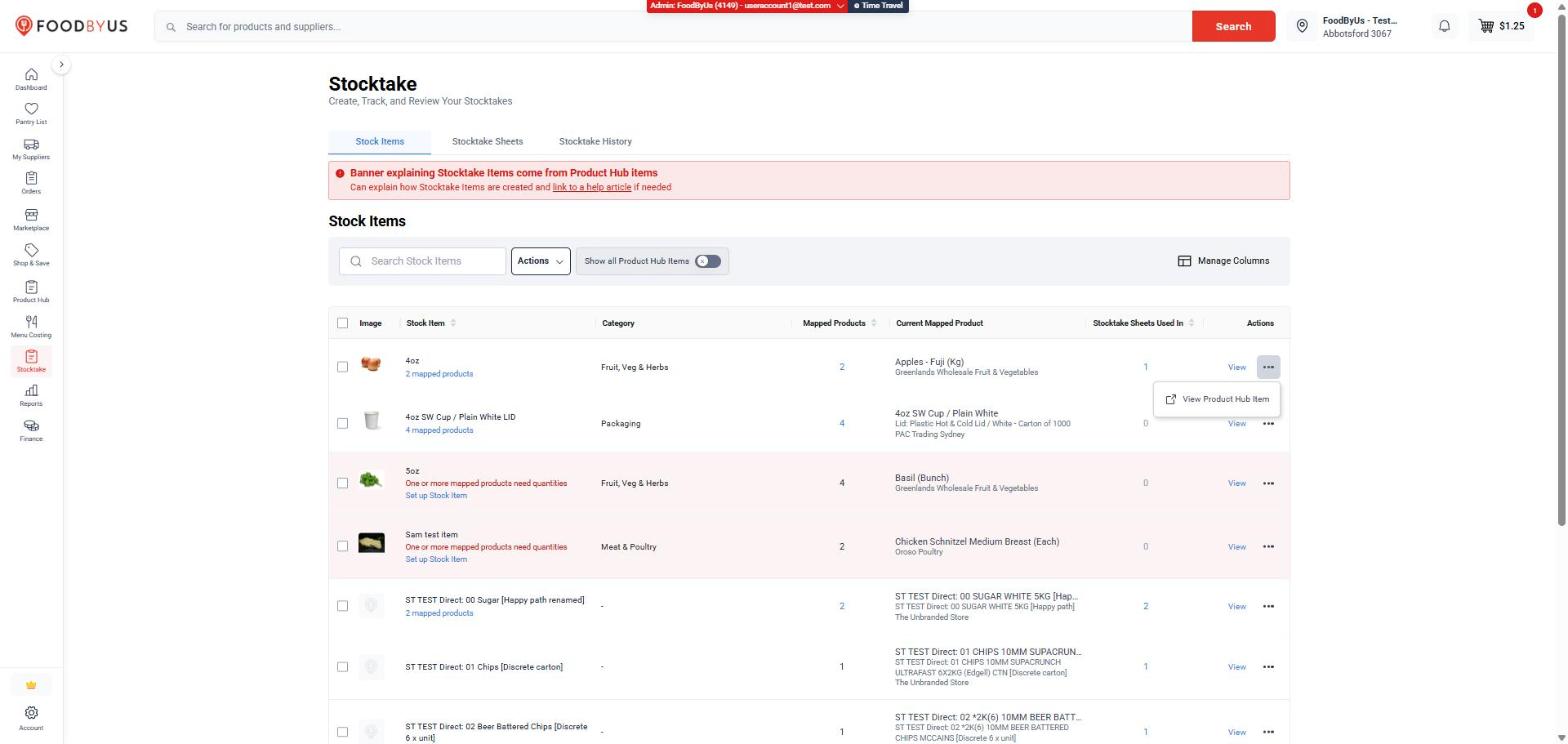
Open Stocktake → Stock Items. Each row shows the item’s category, how many products are mapped to it, the product currently in use, and how many sheets it’s on.
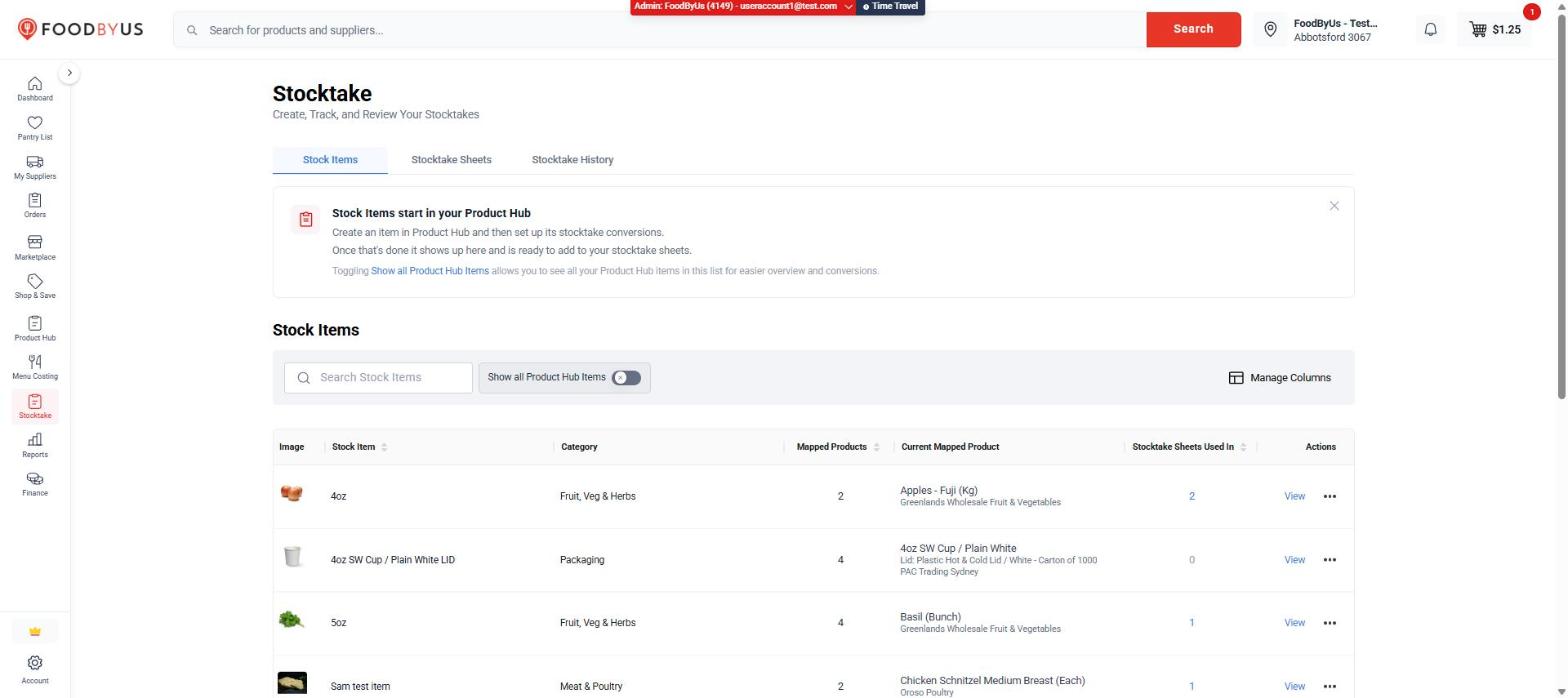
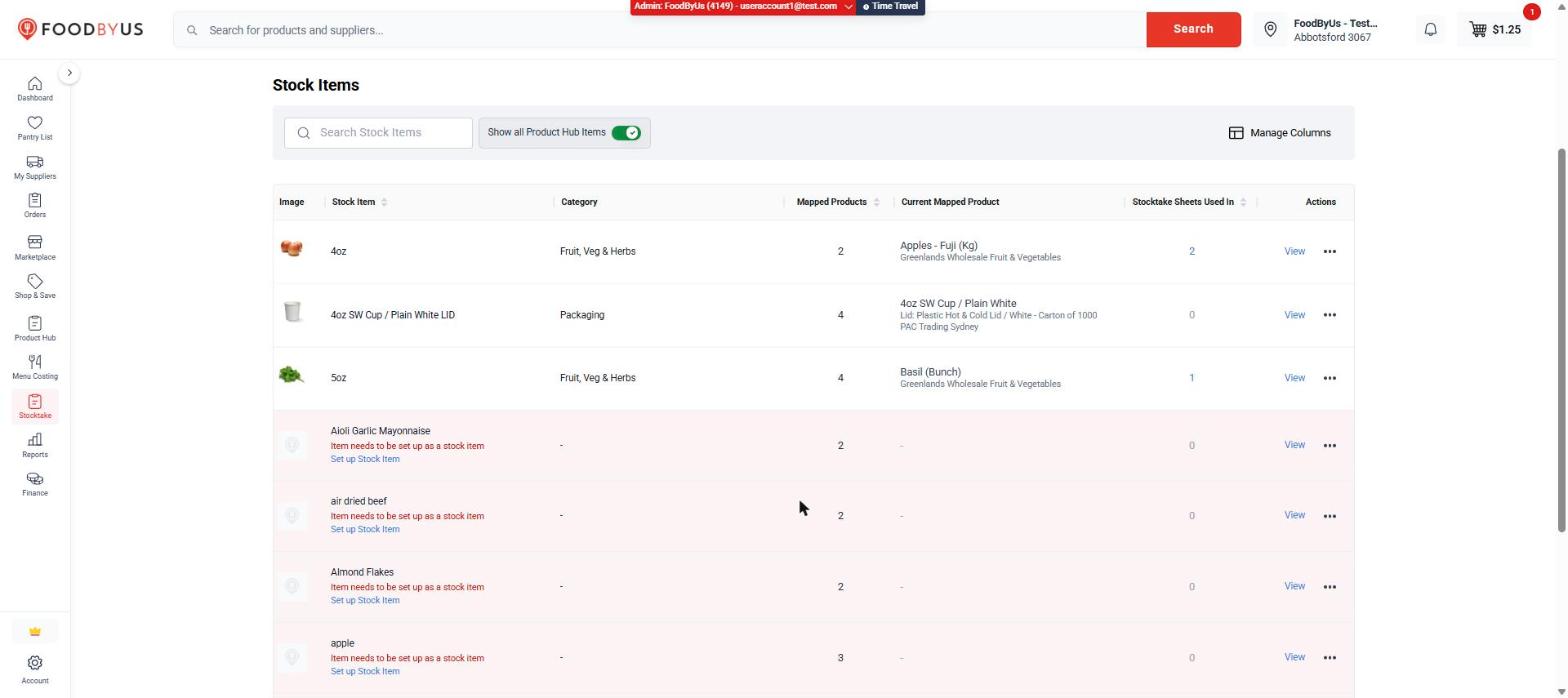
By default this tab lists items that are already Stock Items. Switch on Show all Product Hub Items to also list items that haven’t been set up yet. They’re flagged Item needs to be set up as a stock item, with a Set up Stock Item link.
You can also check from the Product Hub. The Stocktake Setup column shows each item’s status:
| Icon | Meaning |
|---|---|
| Green tick | Ready to count. |
| Orange warning | Started, but one or more mapped products still need a quantity. |
| Red cross | Not set up for Stocktake yet. |
Set up an item for Stocktake
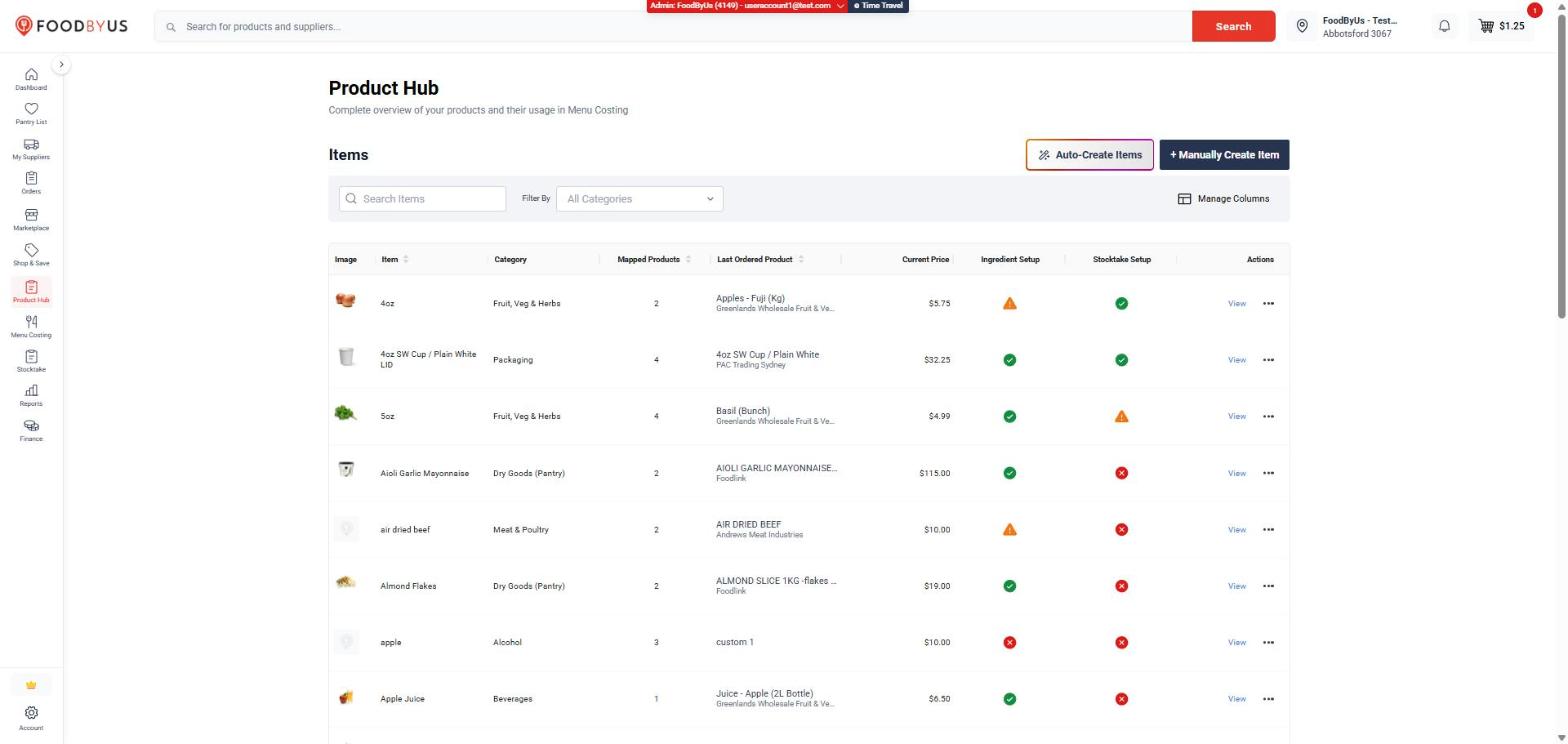
- Go to Product Hub and select View next to the item. (You can also select Set up Stock Item from the Stock Items tab and skip to step 4.)
- Scroll down to Stocktake Settings.
- Select Set up Stock Item.
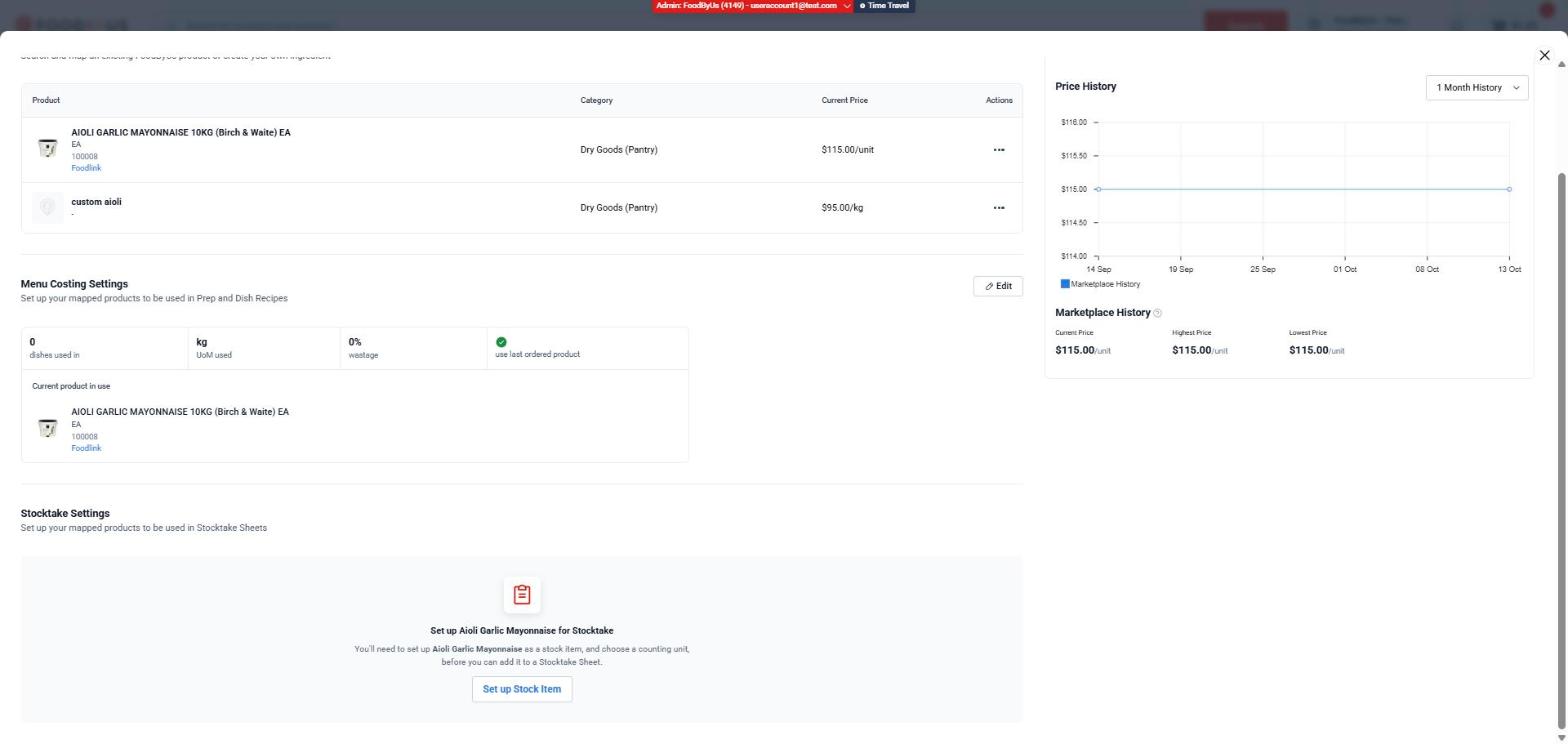
- In the Stocktake Settings window, choose the unit you count this item by. The list starts with the default measurements (Units, g, kg, ml and so on). If yours isn’t there, select Add a new Custom Measurement at the bottom of the list.
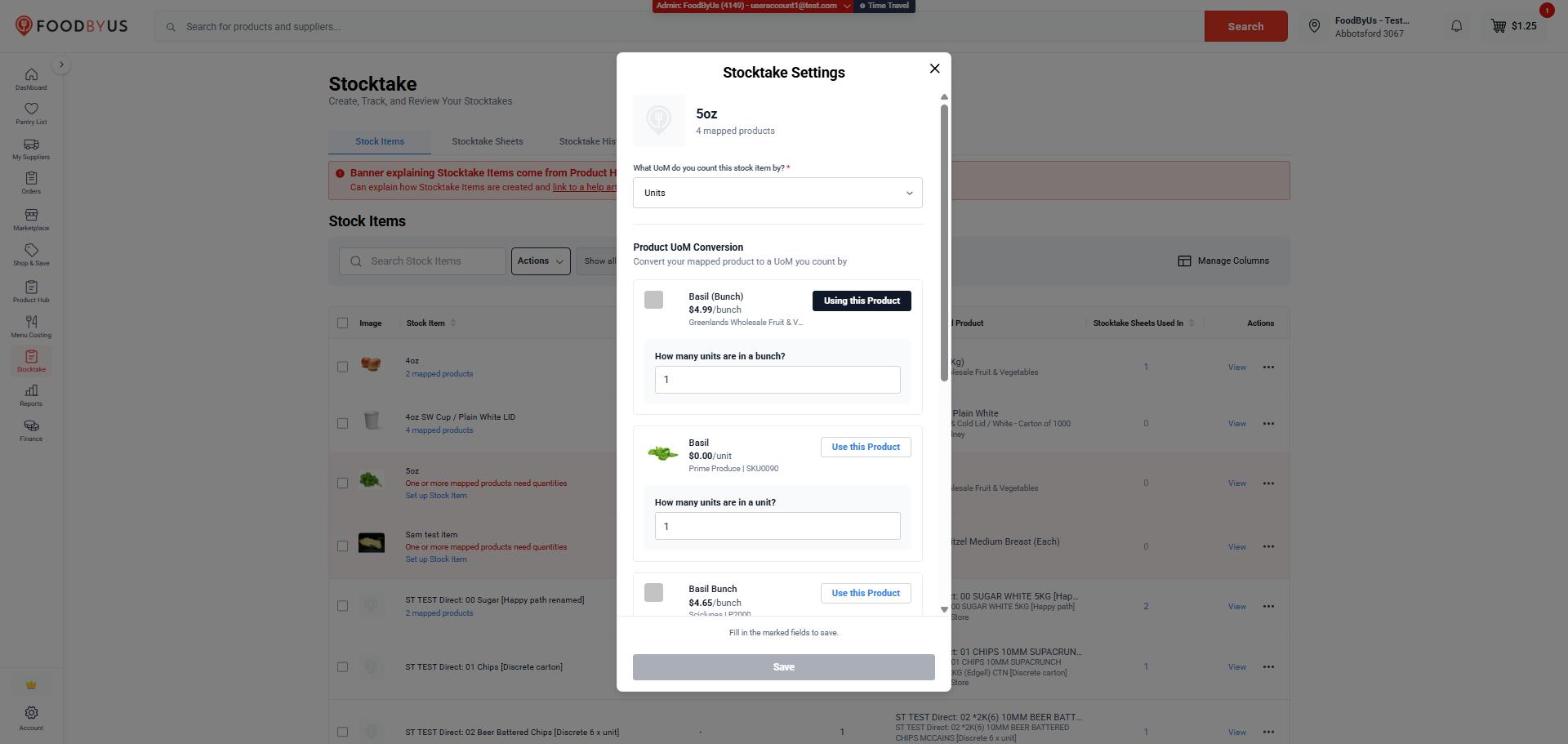
- Under Product UoM Conversion, tell us how each mapped product relates to your counting unit. For example, if you count basil in units and a bunch is one unit, enter 1. If a carton holds 12 units, enter 12.
- Choose the product to count against by selecting Use this Product. The one marked Using this Product is the one shown on your stocktake sheet.
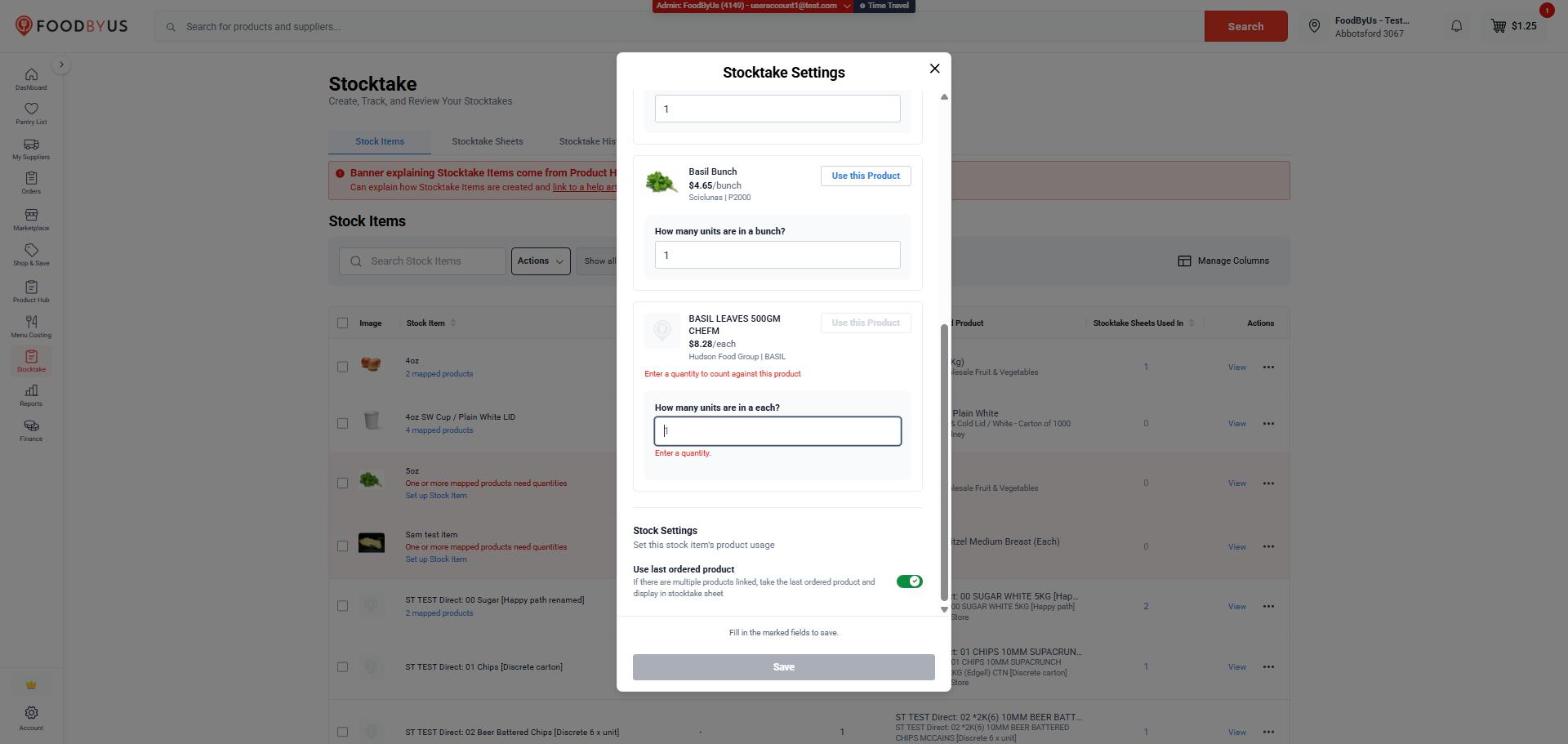
- Select Save. The button stays grey until every required field is filled in.
Use last ordered product
At the bottom of the window is a Use last ordered product switch. When it’s on and an item has several products, Stocktake shows whichever one you ordered most recently, so your counts and costs follow what you actually buy.
Step 2: Create a Stocktake Sheet
A sheet is a list of everything you count in one place, so a count follows the way you walk around your venue.
Create a sheet
- Go to Stocktake → Stocktake Sheets.
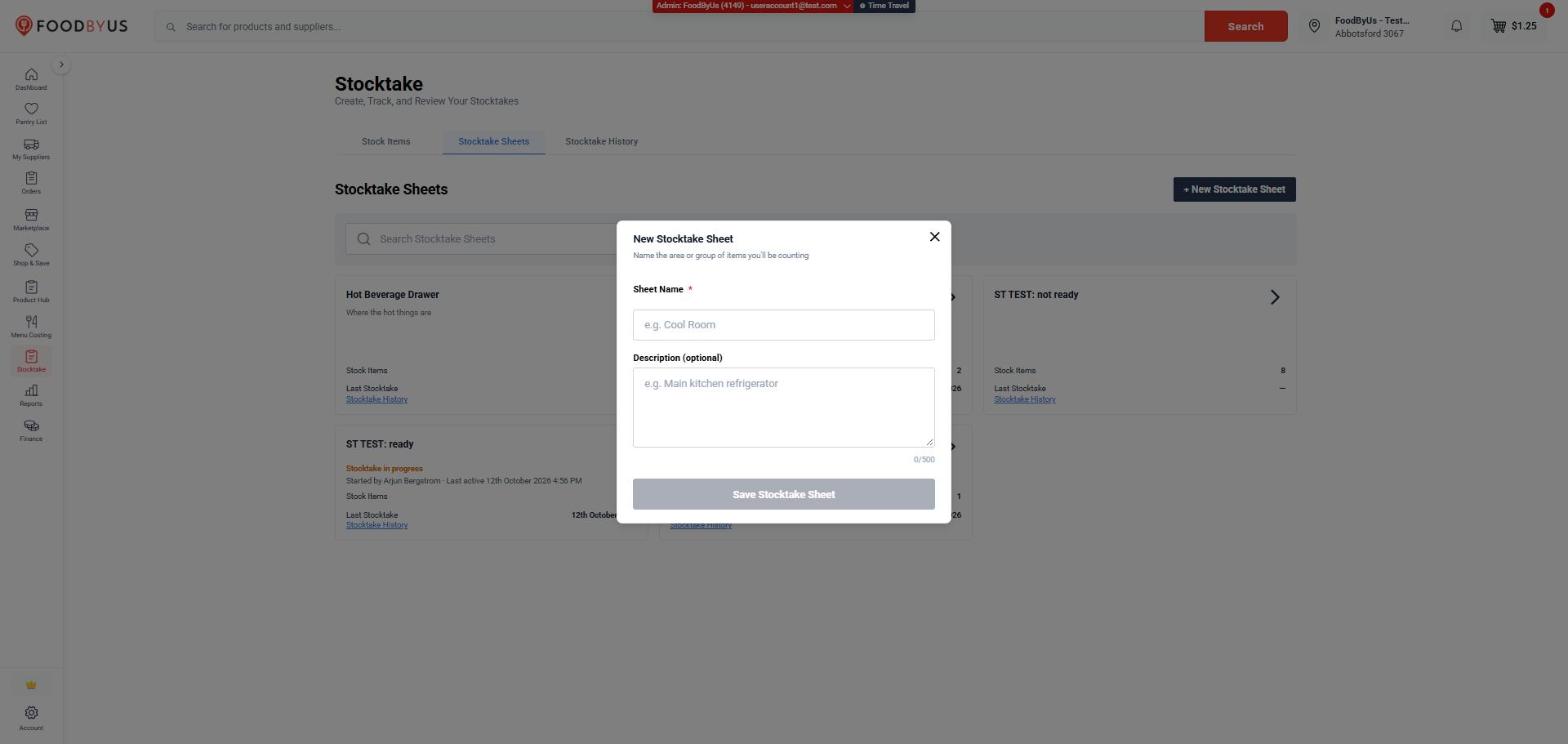
- Select + New Stocktake Sheet.
- Enter a Sheet Name (required), such as “Cool Room”. You can add an optional description of up to 500 characters.
- Select Save Stocktake Sheet.
Add Stock Items to a sheet
- Open the sheet by selecting its card.
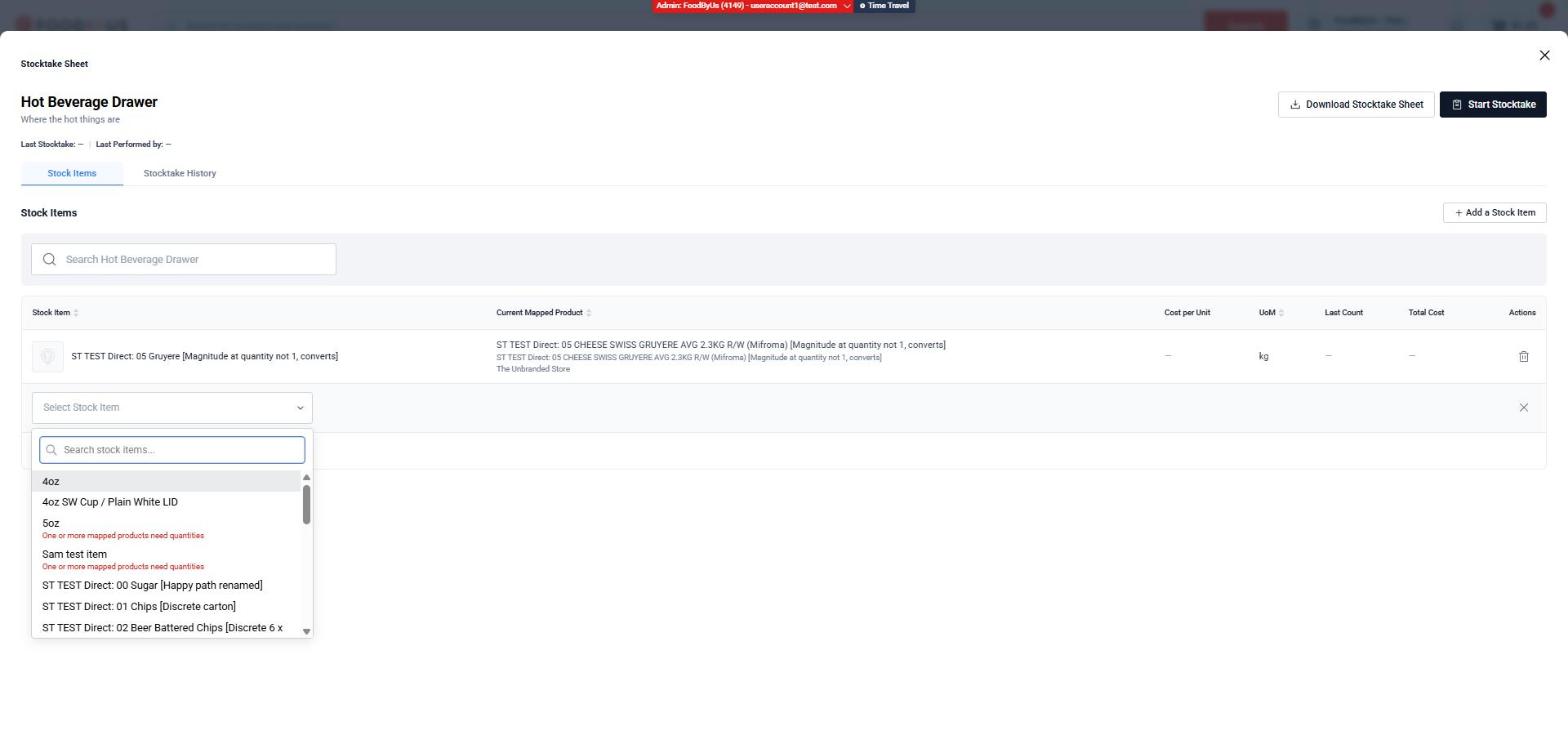
- Select + Add a Stock Item (or + Add another Stock Item under the list).
- Choose an item from the dropdown, or type to search. Items that still need a quantity are flagged in red and need finishing in Step 1 first.
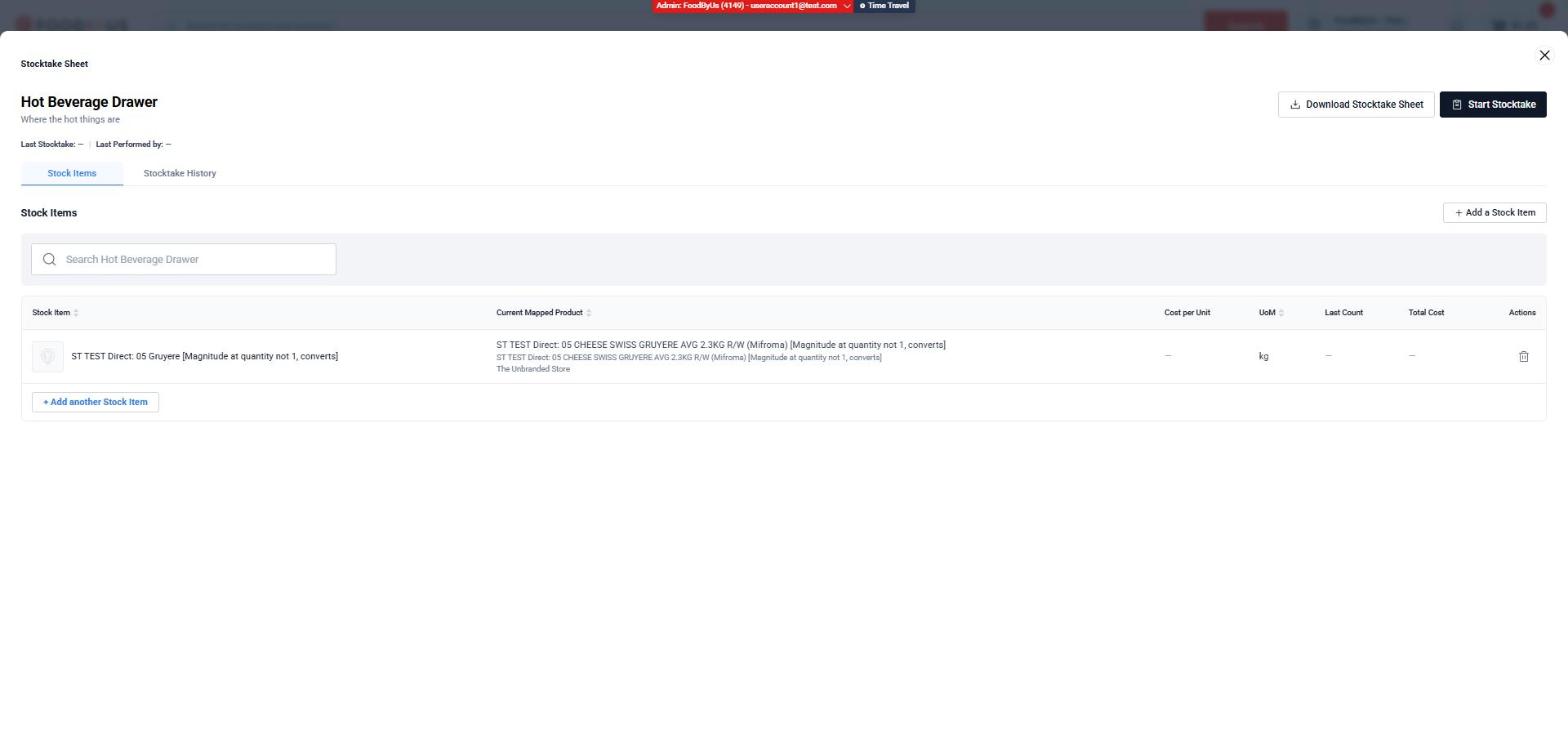
To remove an item from a sheet, select the bin icon at the end of its row. This only removes it from this sheet. The item stays in your Product Hub and on any other sheets.
Step 3: Do a stocktake
Before you start: items that aren’t ready
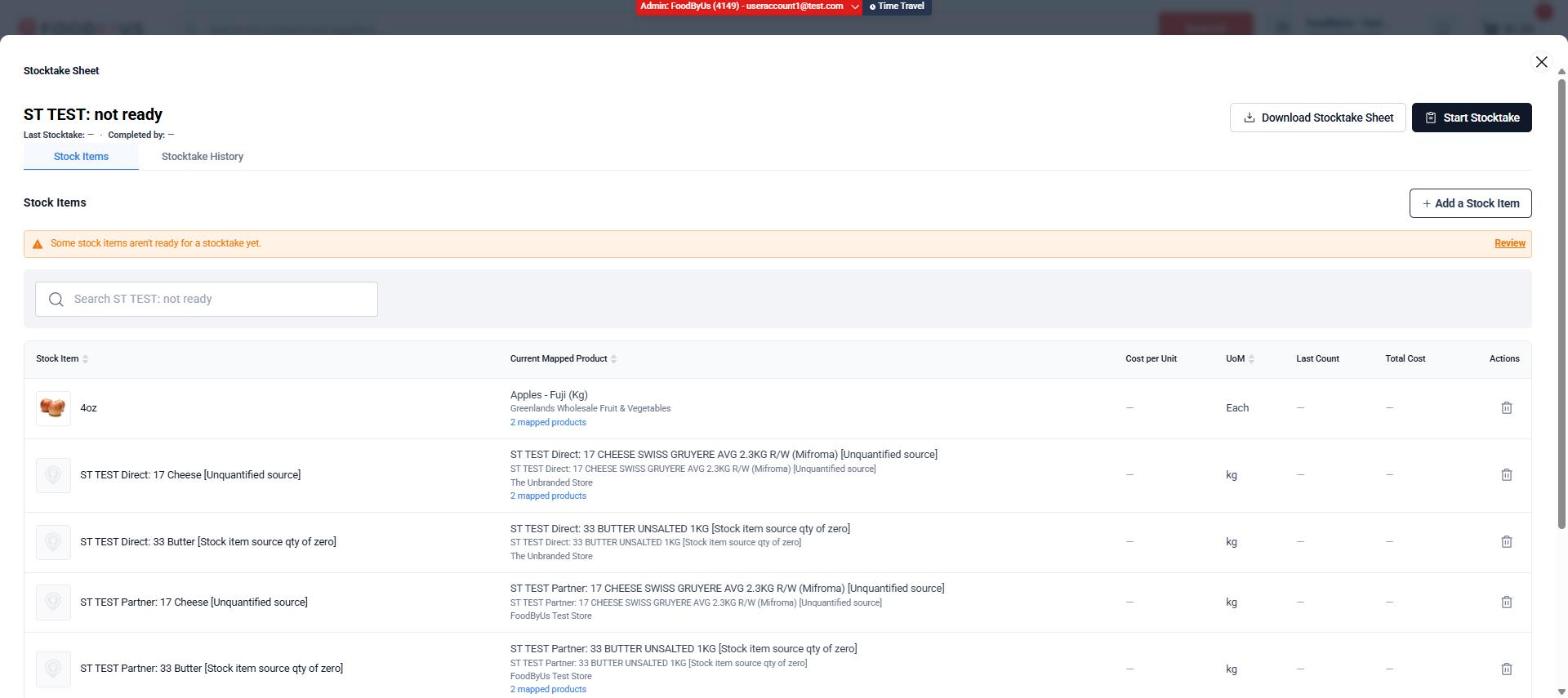
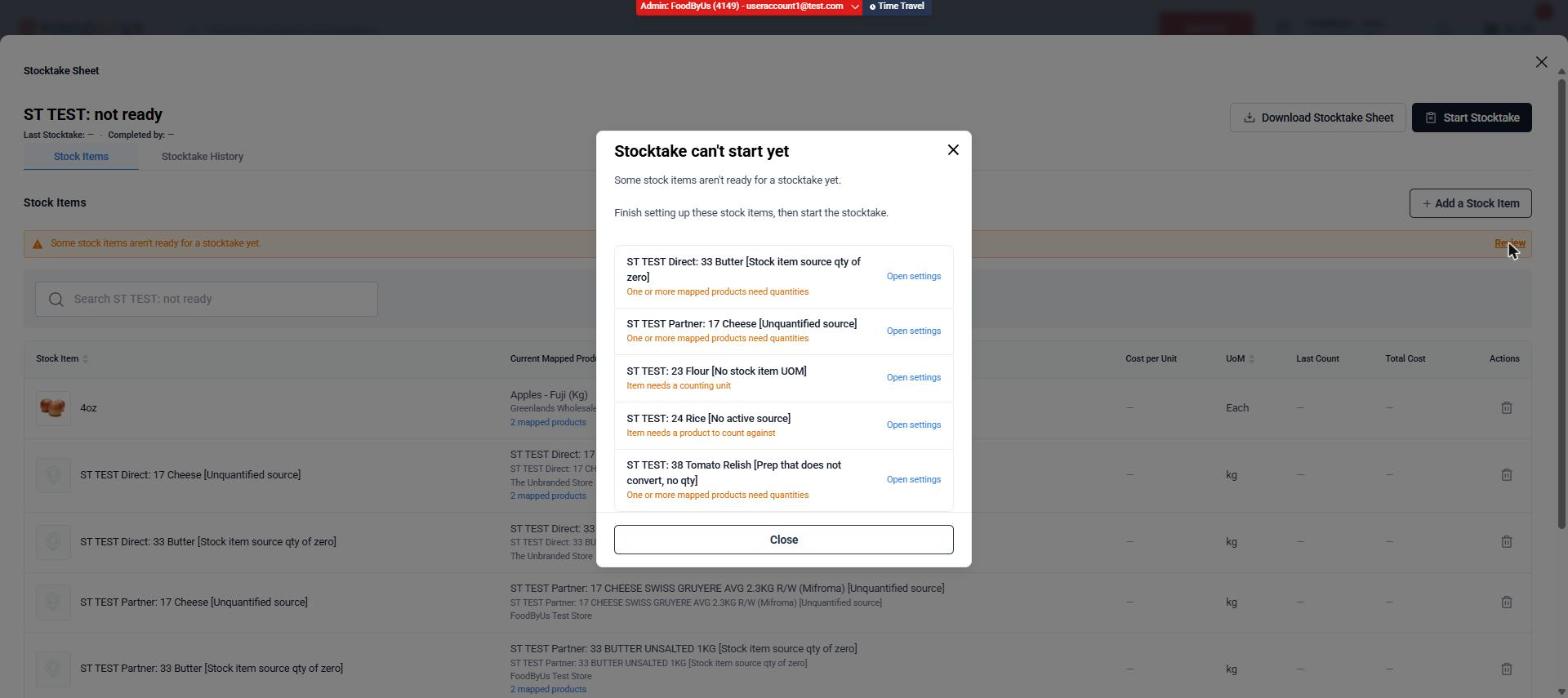
If any Stock Item on a sheet still needs setting up, the sheet shows an orange warning, Some stock items aren’t ready for a stocktake yet, and you can’t start a count. Select Review to see which items need attention and why:
| Message | What to do |
|---|---|
| One or more mapped products need quantities | Enter a quantity for every mapped product in the item’s settings. |
| Item needs a counting unit | Choose the unit you count the item in. |
| Item needs a product to count against | Choose the product the count should use. |
Select Open settings beside an item to fix it, then start the stocktake.
Count
- Open the sheet you want to count.
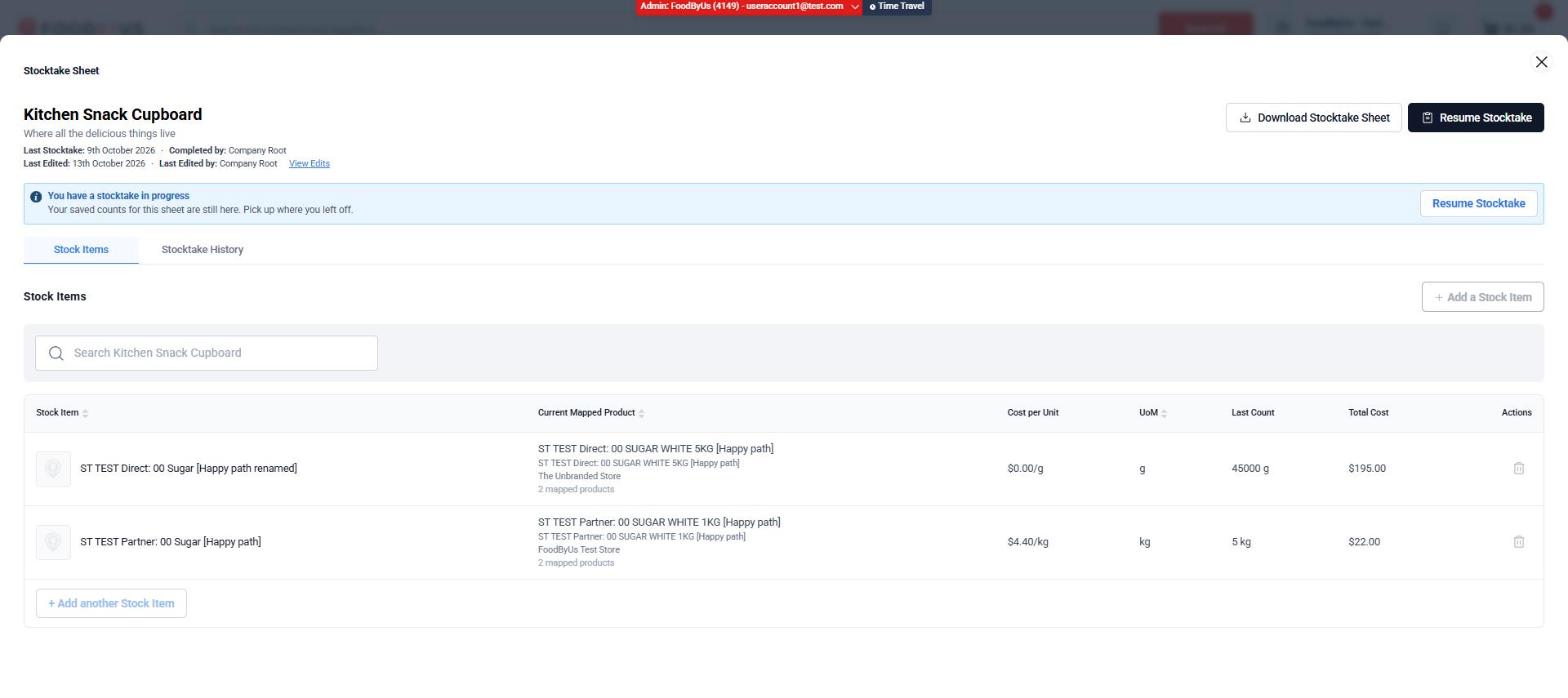
- Select Start Stocktake. If a count is already in progress, you’ll see Resume Stocktake instead. The sheet card shows who started it and when it was last active, and inside the sheet a blue message reads You have a stocktake in progress. Your saved counts for this sheet are still here. Pick up where you left off.
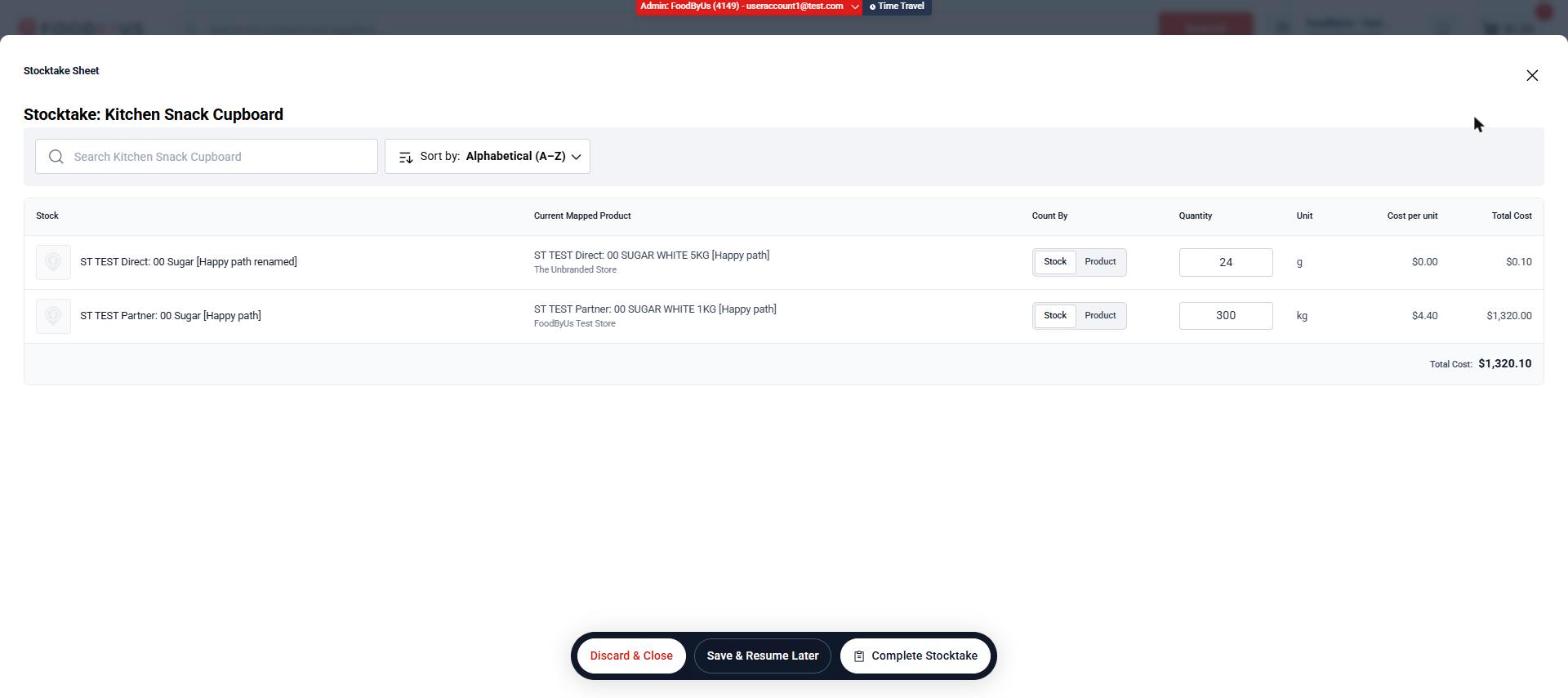
- For each Stock Item, type the quantity you can see into the Quantity box. The Unit shows what you’re counting in. The Cost per unit and Total Cost update as you type, and the Total Cost for the whole sheet is shown at the bottom right.
- Use the search box or Sort by to find items quickly.
- When you’re done, choose one of the buttons at the bottom of the screen (see below).
| Button | What it does |
|---|---|
| Complete Stocktake | Asks you to confirm (This will finalise all your entries), then saves your count to Stocktake History and finishes the stocktake. Items you didn’t count stay blank. |
| Save & Resume Later | Keeps your saved counts so you or a colleague can carry on later. The sheet shows Stocktake in progress until it’s finished. |
| Discard & Close | Asks what you’d like to do. Choosing Discard & Close again deletes the stocktake and all its counts, for everyone counting it. |
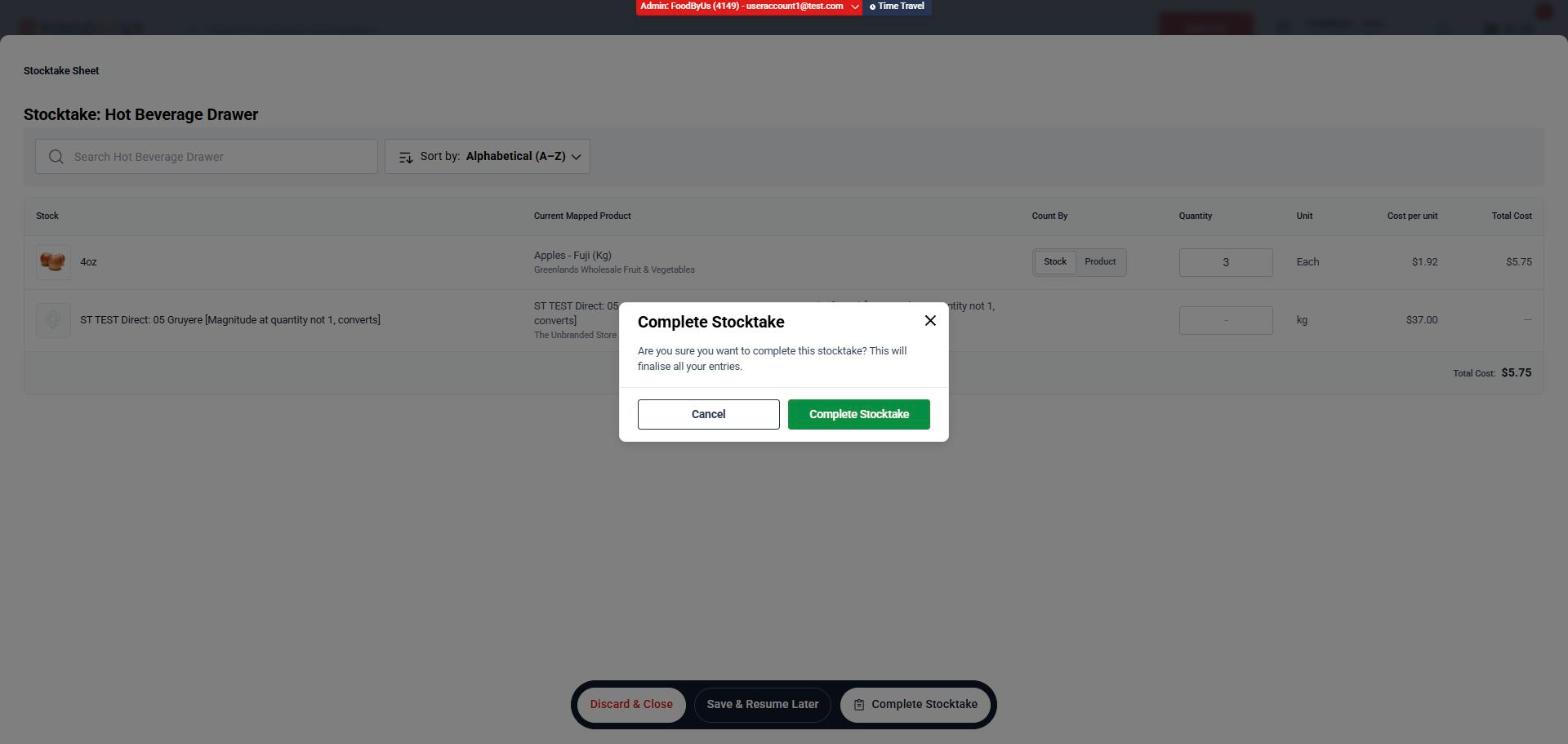
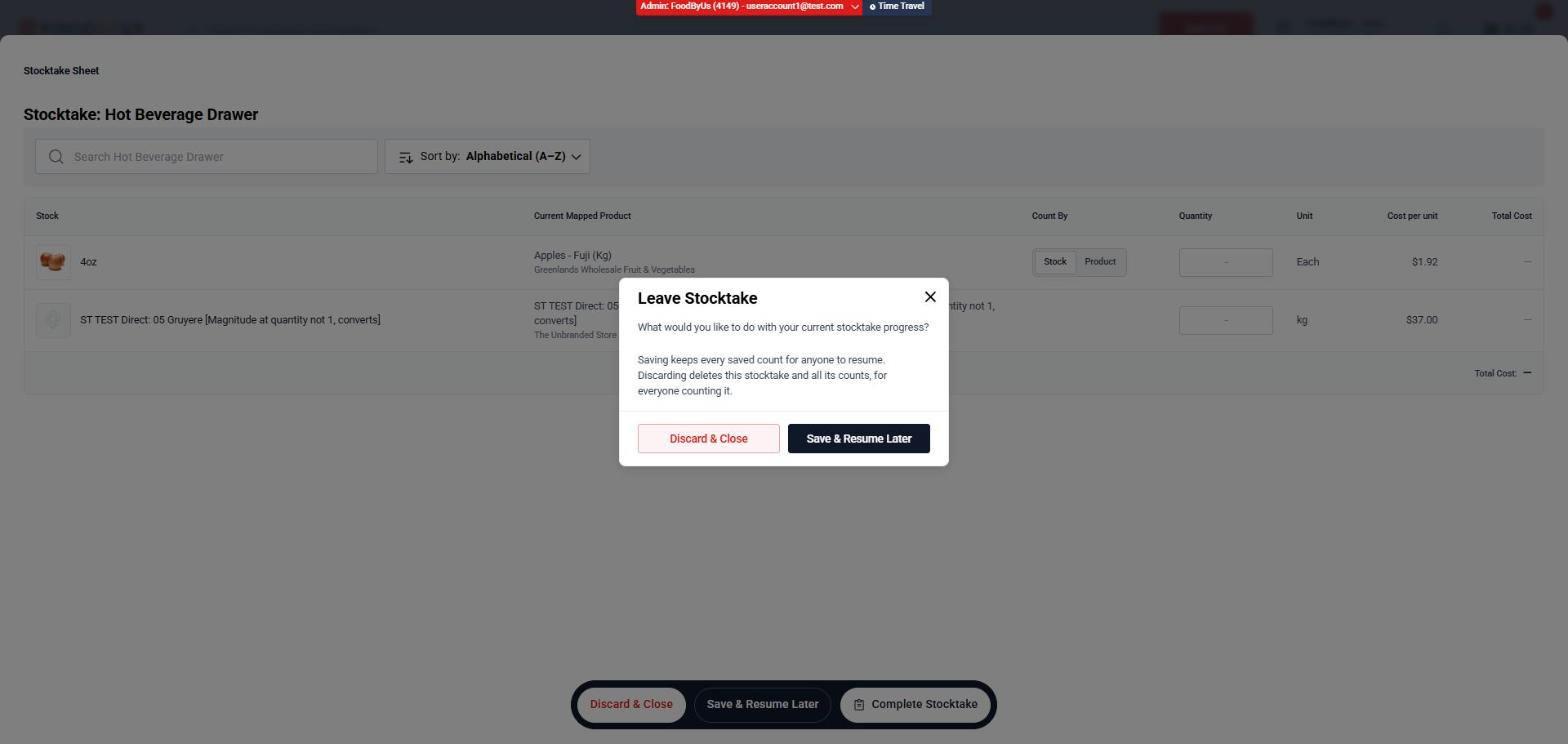
When a stocktake is completed, the sheet shows the Last Stocktake date, who performed it, and each item’s Last Count and Total Cost. Items you left blank show a dash (—).
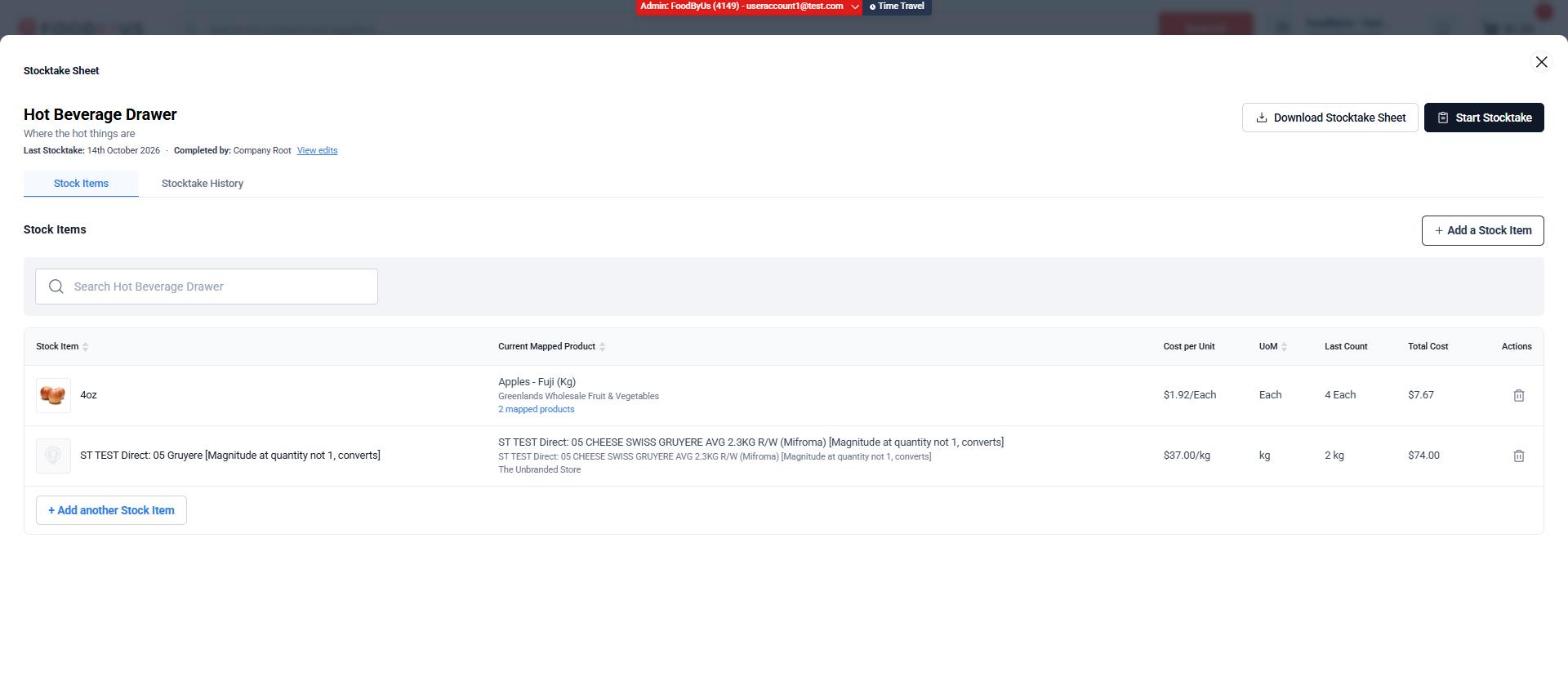
Print a count sheet
If you’d rather count on paper first, open a sheet and select Download Stocktake Sheet. It opens a printable Stock Count Sheet (a PDF) listing every Stock Item and its mapped products, with the supplier, the sell unit, the unit you count in, and empty boxes to write your count. A star (★) marks the product currently in use. Enter your paper counts into the stocktake afterwards.
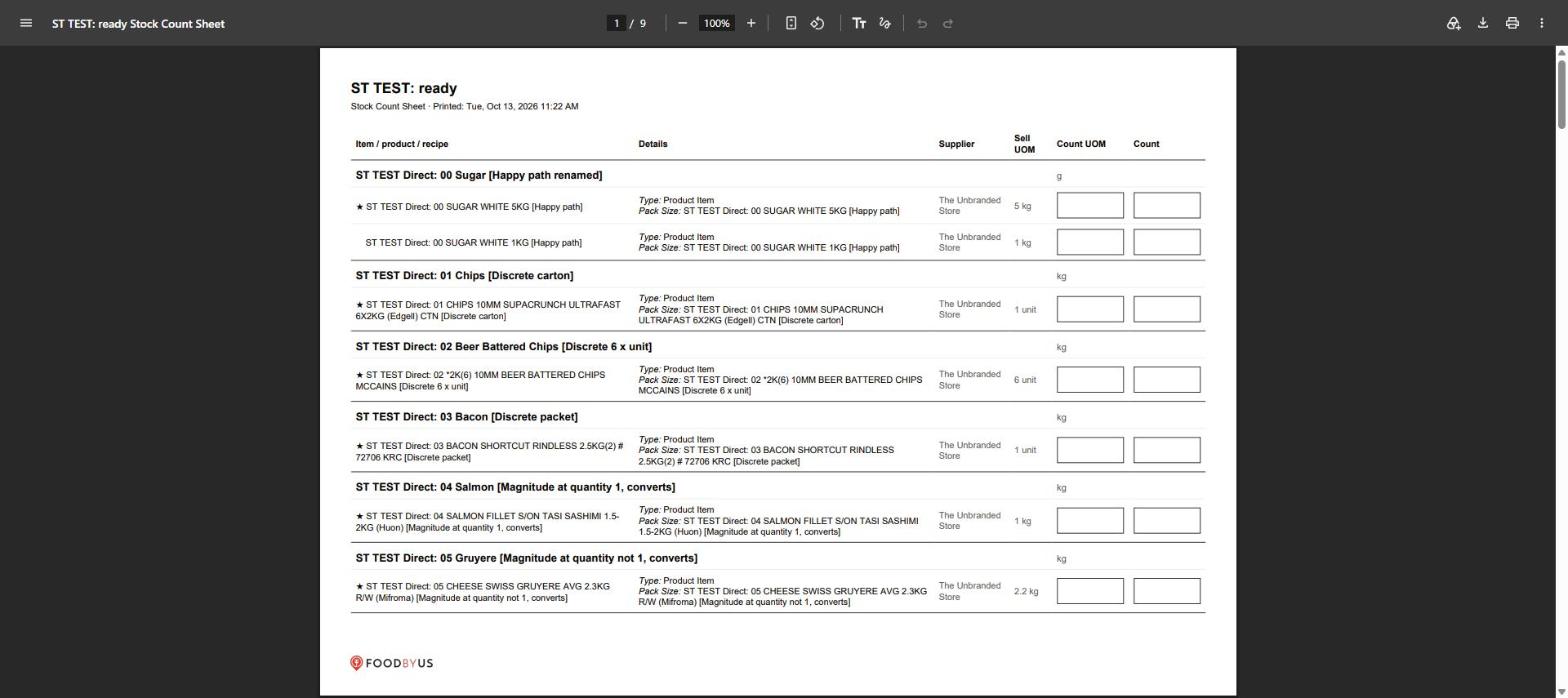
Counting by Stock or by Product
If an item has more than one product mapped to it, you can choose how to count it using the Count By switch:
- Stock counts the item as a whole, in your counting unit.
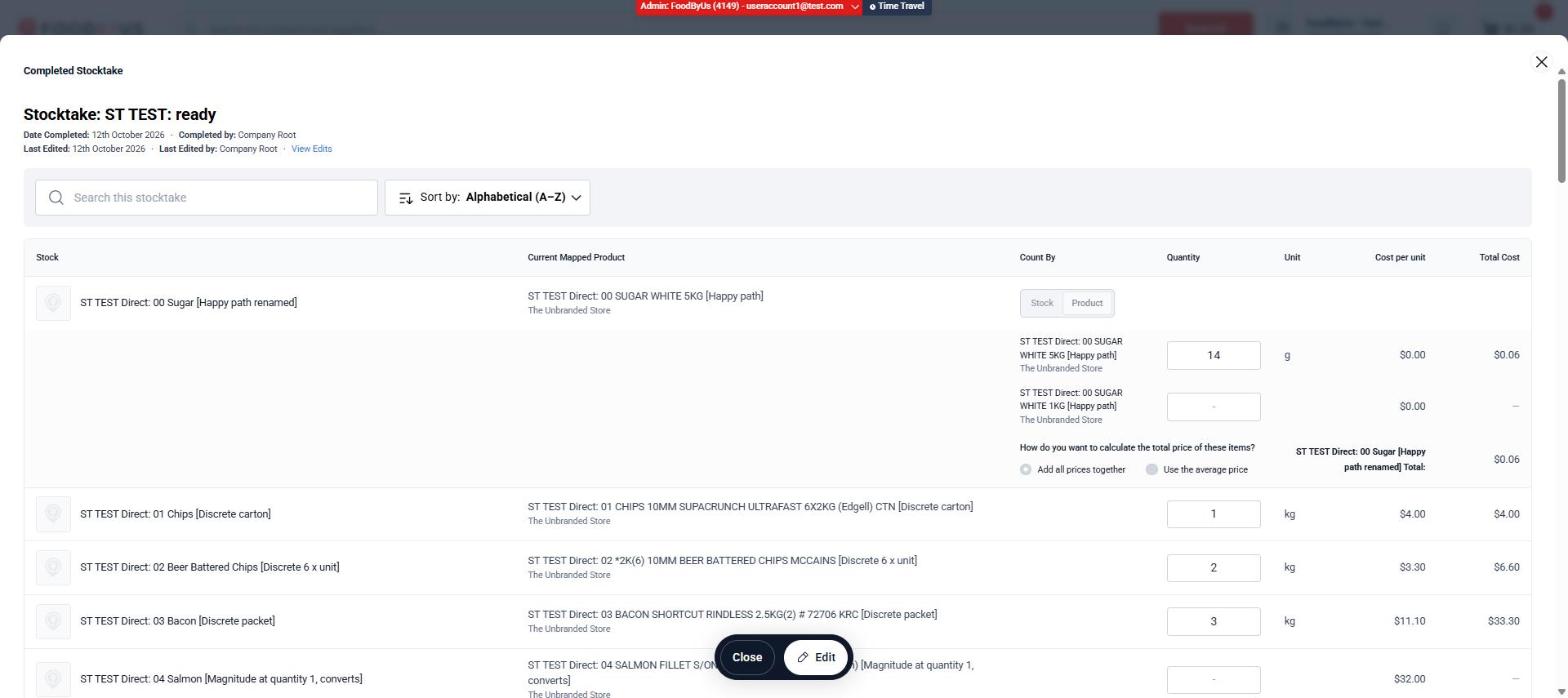
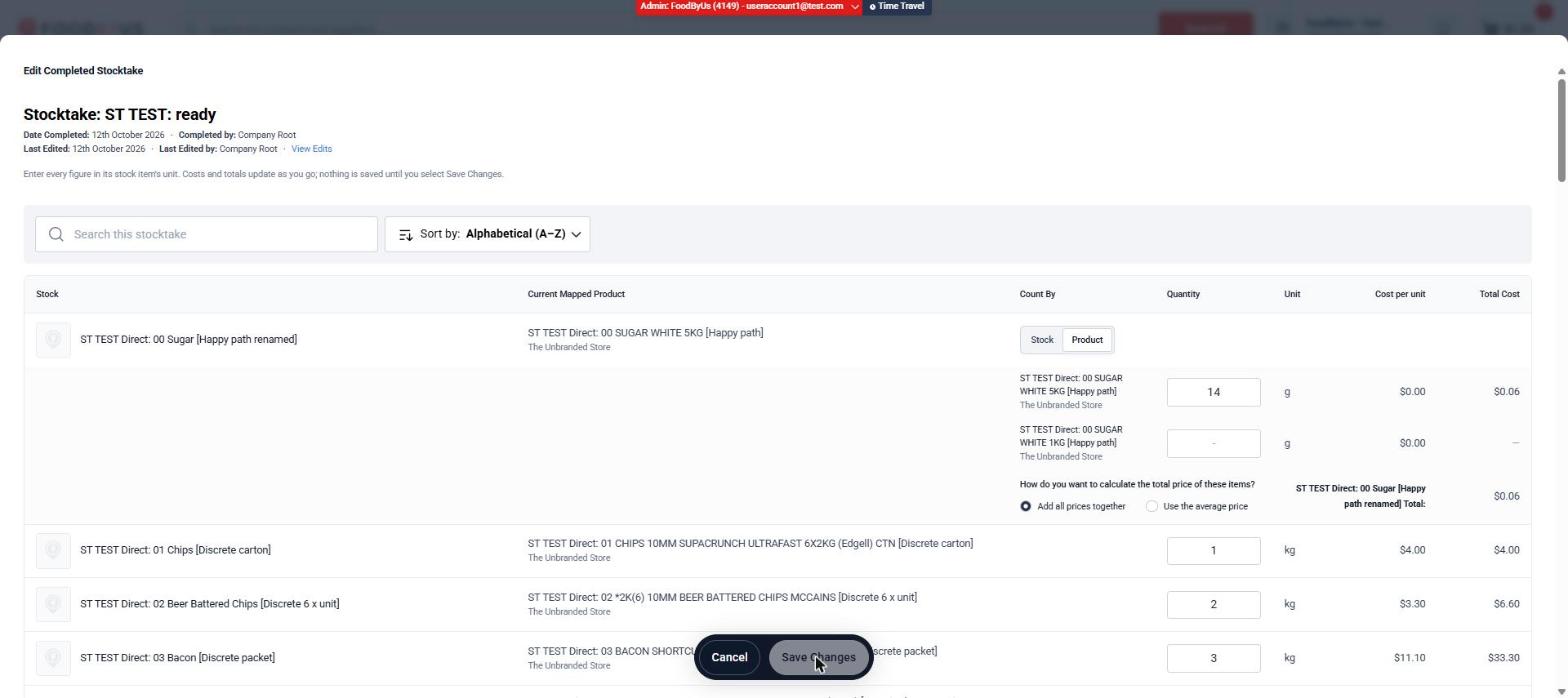
- Product lets you enter a separate quantity for each mapped product (for example, 5 kg bags and 1 kg bags of sugar). You’ll then be asked How do you want to calculate the total price of these items? Choose Add all prices together to value each product at its own price, or Use the average price to value the whole count at the average of their prices.
Reviewing and editing past stocktakes
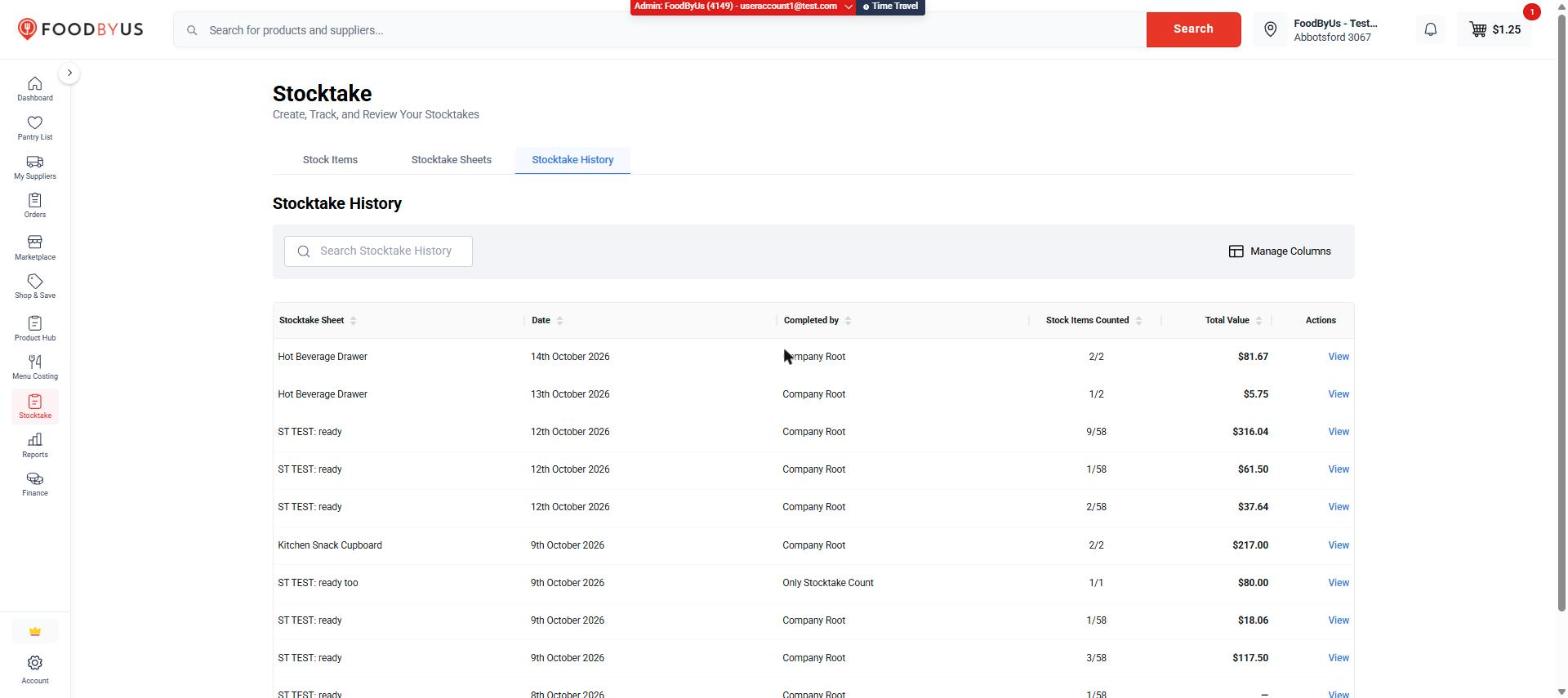
Open Stocktake → Stocktake History to see every completed stocktake. For each one you’ll see the sheet, the date, who completed it, how many Stock Items were counted (for example, 9/58) and the total value of the count.
- Select View to open the full count, with every quantity, cost per unit and total.
- The record shows Date Completed, Completed by, Last Edited and Last Edited by.
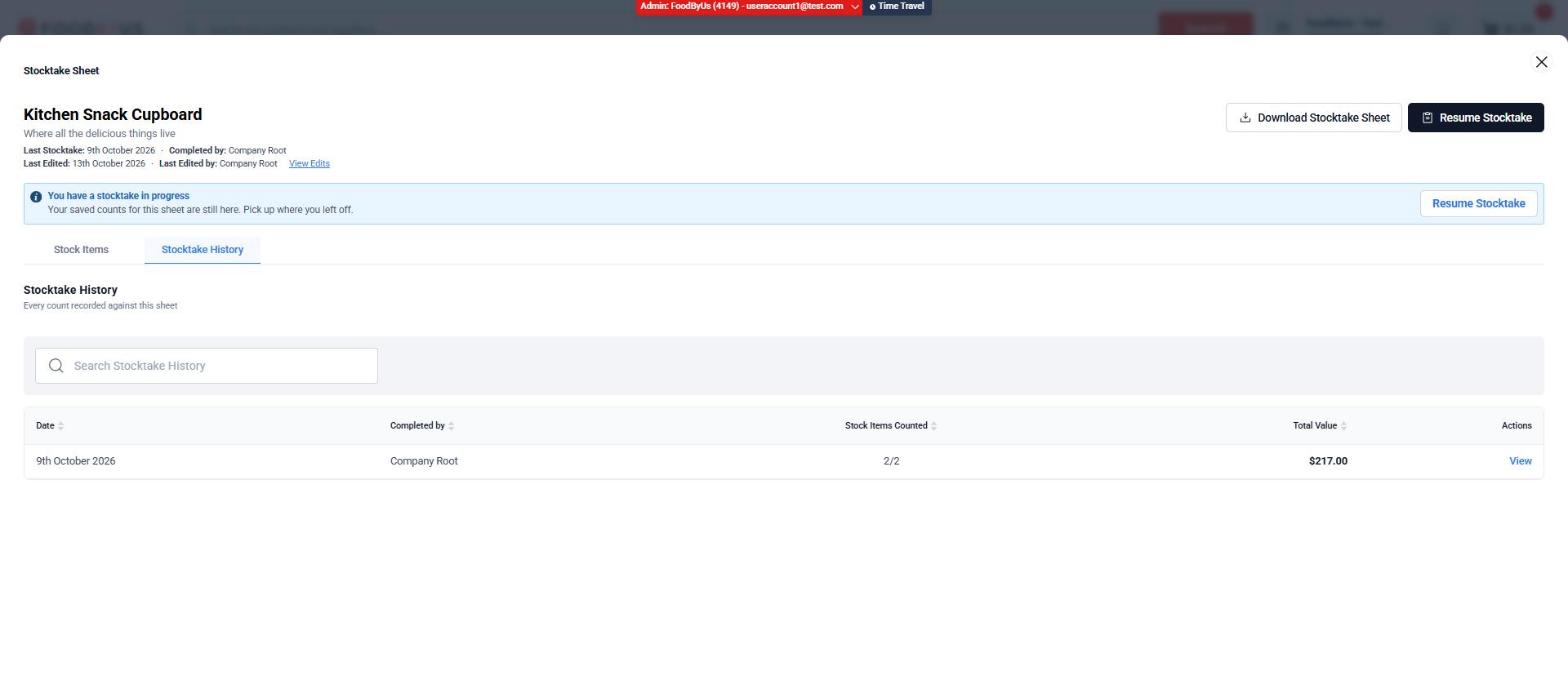
- To see the history of one sheet only, select the Stocktake History link on its card, or the Stocktake History tab inside the sheet.
- Use Manage Columns to choose which columns to show, and the search box to find a stocktake by sheet name.
See what changed: View Edits
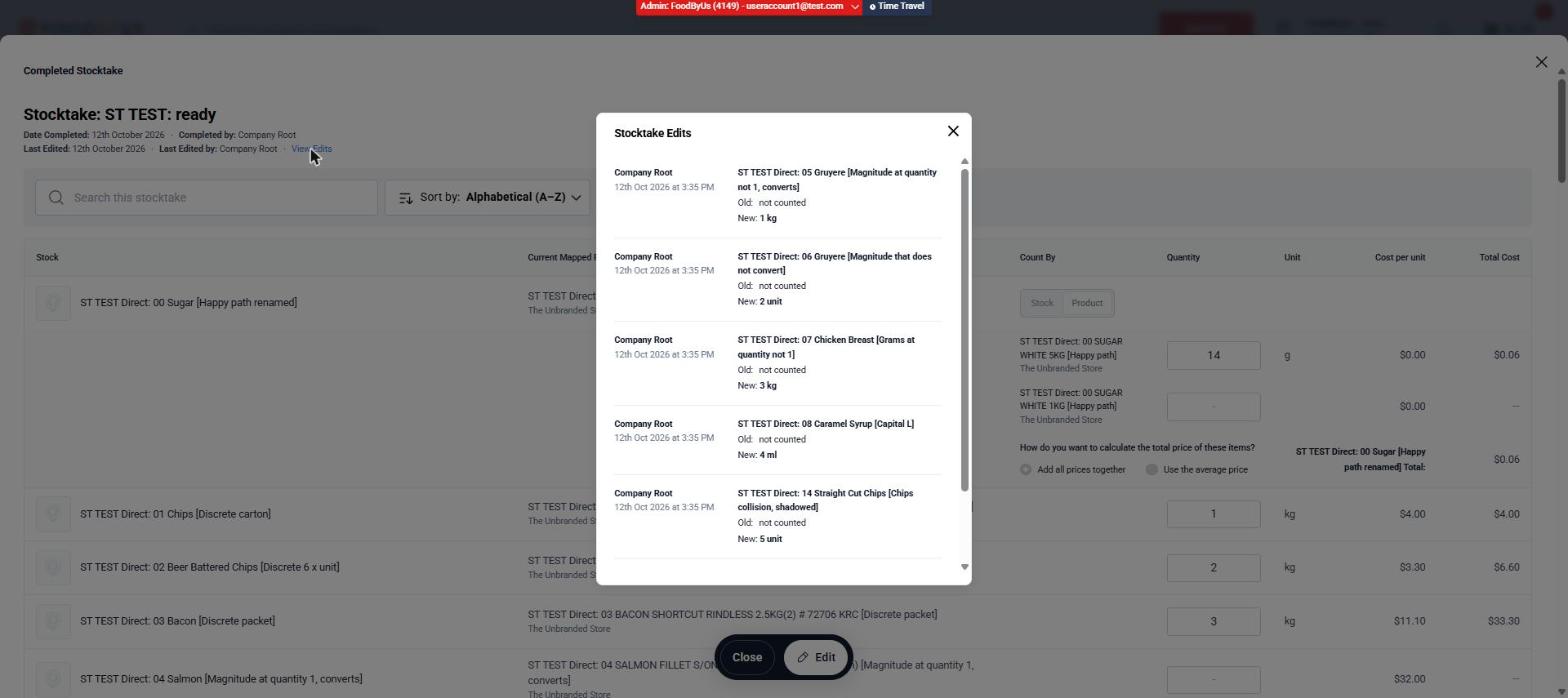
Select View Edits next to Last Edited to open a log of every change. Each entry shows who made the change and when, which Stock Item it was, and the Old and New quantity (for example, Old: not counted, New: 1 kg). The same View Edits link is also at the top of a sheet that has had its counts edited.
Correct a completed stocktake
- Open the record from Stocktake History.
- Select Edit at the bottom of the screen.
- Change any quantity. Enter every figure in its Stock Item’s unit. Costs and totals update as you type.
- Select Save Changes. Nothing is saved until you do. Select Cancel to leave without changing anything.
Recording comps and wastage
A stocktake tells you what’s on the shelf. Comps & Wastage is a simple log of what went missing in between. Record anything that was thrown out, dropped, spilled, expired, given away as a comp or eaten as a staff meal, along with its dollar cost.
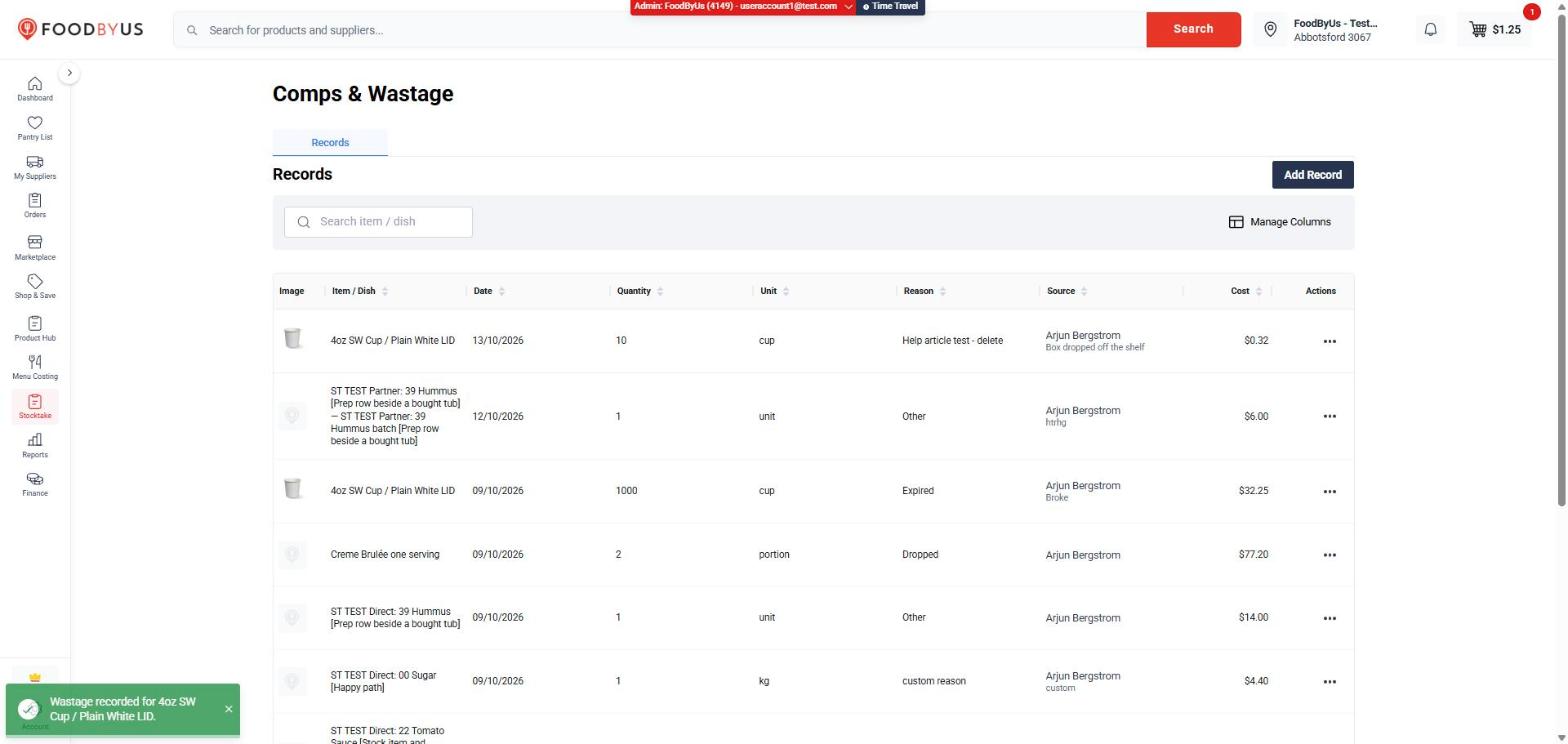
Open Stocktake → Comps & Wastage. The Records list shows every entry, newest first.
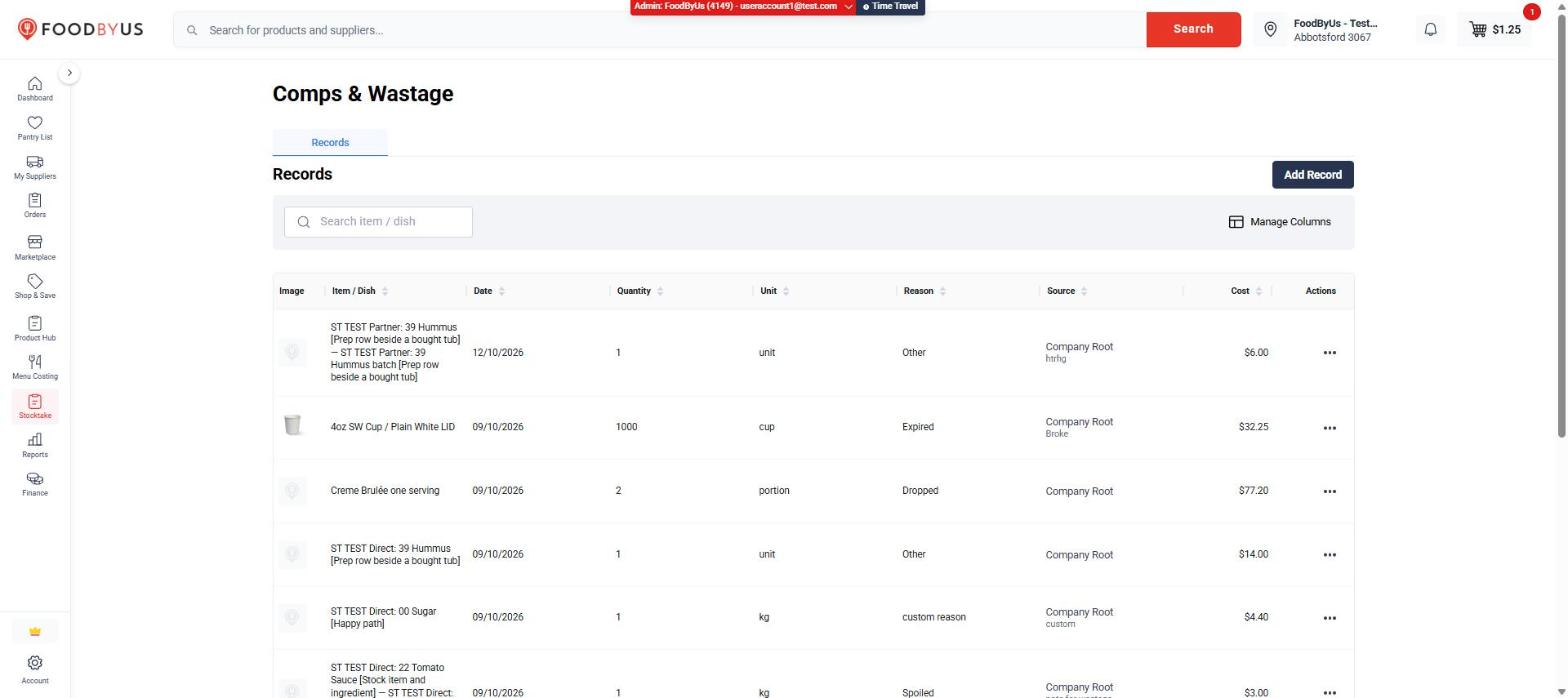
| Column | What it shows |
|---|---|
| Item / Dish | What was wasted. Both Stock Items and dish recipes can be recorded. |
| Date | The day it happened. |
| Quantity and Unit | How much, in the item’s own unit (for example kg, cup or portion). |
| Reason | Why it was wasted. |
| Source | Who recorded it, with their note underneath. |
| Cost | The dollar value of what was lost. |
Use the search box to find an item or dish, Manage Columns to choose which columns to show, and the arrows on a column heading to sort.
Record wastage
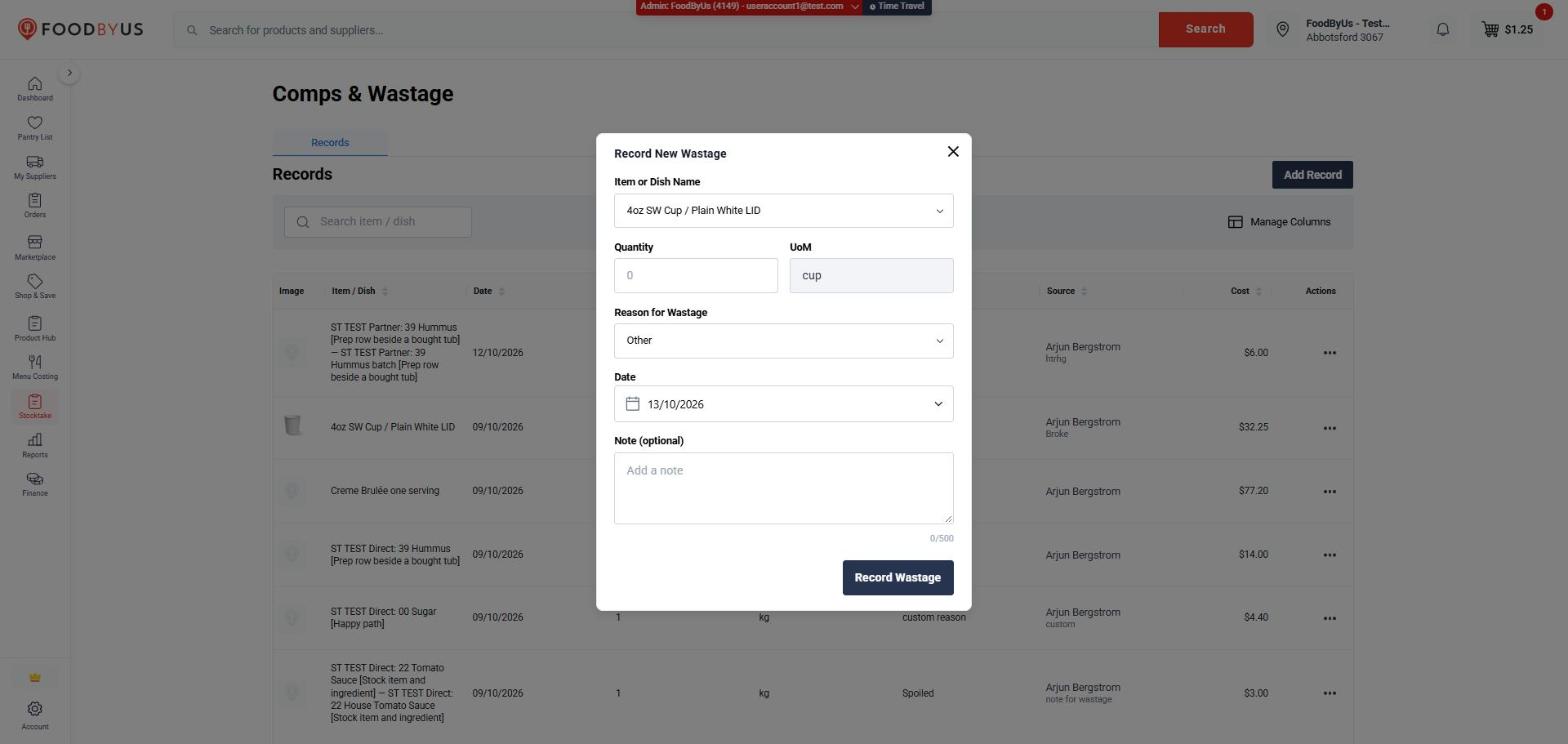
- Select Add Record.
- Choose the Item or Dish Name. Type to search. Stock Items and Dish recipes are listed in separate groups.
- Enter the Quantity. The UoM (unit) fills in automatically and can’t be changed.
- Choose a Reason for Wastage (see below).
- Check the Date. It starts as today, so change it if this happened earlier.
- Add a Note if you like (up to 500 characters). It appears under the person’s name in the list.
- Select Record Wastage. You’ll see a confirmation message and the entry appears at the top of the list with its cost.
Reasons
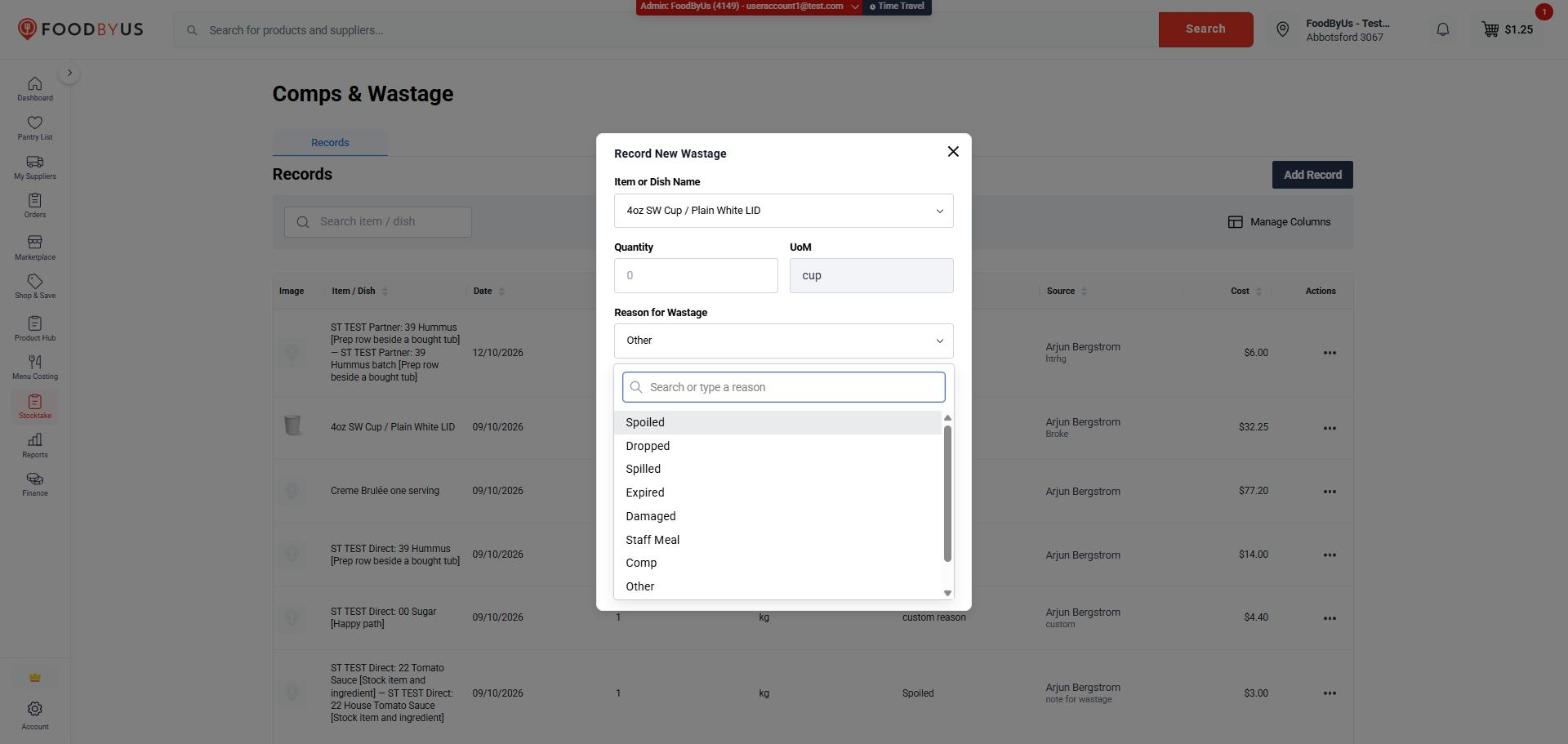
Pick from the list, or type your own:
| Reason | Use it for |
|---|---|
| Spoiled | Went off before it could be used. |
| Dropped / Spilled | Lost during prep or service. |
| Expired | Past its use-by or best-before date. |
| Damaged | Packaging or product was damaged. |
| Staff Meal | Eaten by your team. |
| Comp | Given away to a guest at no charge. |
| Other | Anything else. This is the default. |
To use your own reason, type it in the reason box and select Use “your reason”. Reasons you’ve used before are offered again next time.
How the cost is worked out
The cost is the quantity multiplied by the item’s current unit price. For example, 10 cups from a carton of 1,000 priced at $32.25 is recorded as $0.32.
Delete a record
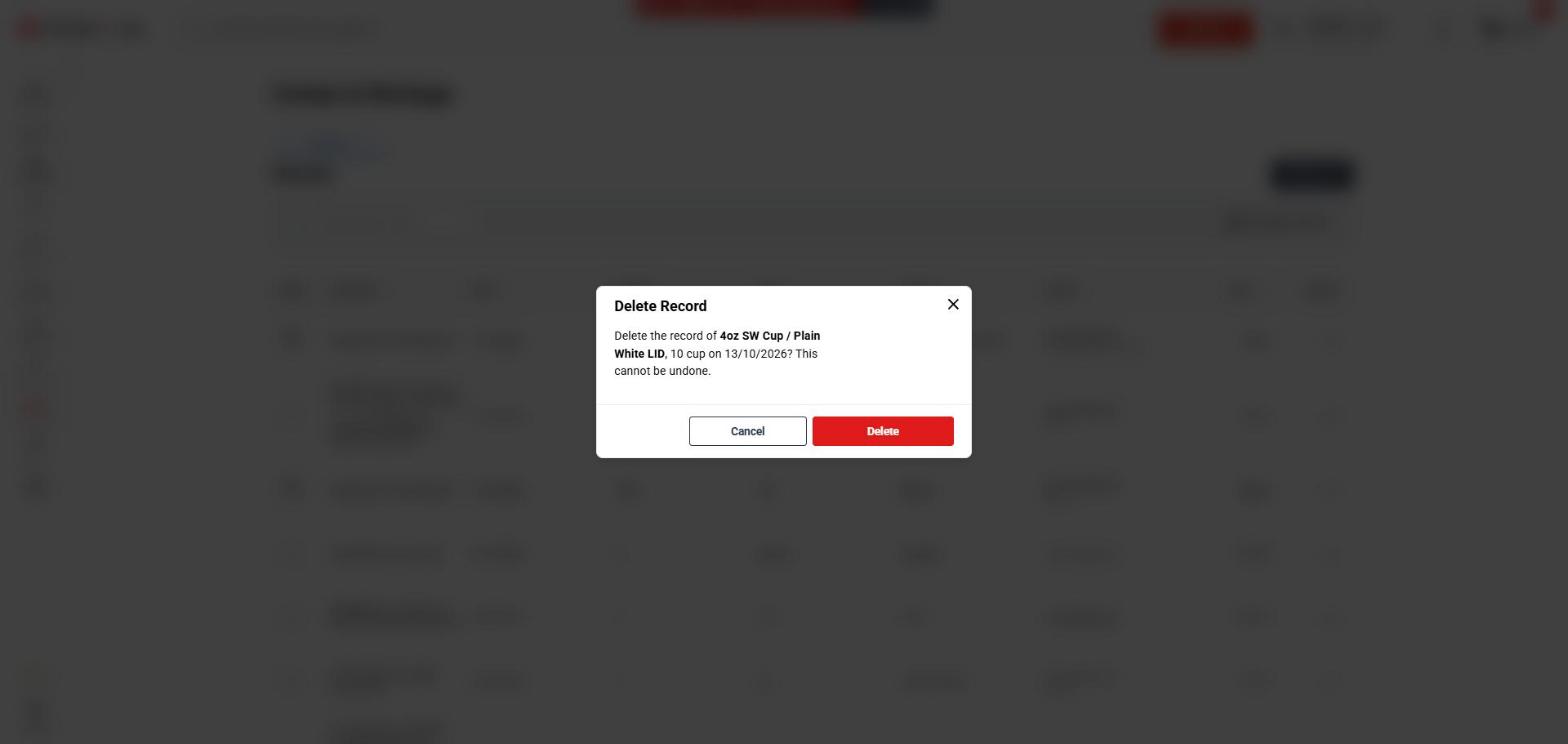
If you recorded something by mistake, select ··· on its row and choose Delete. You’ll be asked to confirm, and this can’t be undone. Records can’t be edited, so delete and re-enter it if a figure is wrong.
Who can do what: user permissions
What a person can do in Product Hub, Menu Costing and Stocktake depends on the roles on their user account. The account owner has every role. Everyone else has only the roles they’ve been given.
The roles at a glance
| Area | Role | In short |
|---|---|---|
| Product Hub | View Product Hub | Can see items and custom products. |
| Manage Product Hub | Can create, edit and delete items and custom products. | |
| Menu Costing | View Recipes | Can see ingredients, prep recipes and dish recipes. |
| Manage Recipes | Can create, edit and delete recipes. | |
| Stocktake | Stocktake Count | Can run and complete a stocktake. |
| Manage Stocktake | Can create and manage stocktake sheets and set up Stock Items. | |
| Manage Comps & Wastage | Can record, view and delete comps and wastage. |
Manage roles include the “view” permissions they need, so you don’t have to give someone both View and Manage.
Product Hub
| What you can do | View Product Hub | Manage Product Hub |
|---|---|---|
| Open the Product Hub and see items and their mapped products | ✓ | ✓ |
| See custom products and custom units | ✓ | ✓ |
| Create an item (manually) | — | ✓ |
| Auto-create items | — | ✓ |
| Rename an item | — | ✓ |
| Map products to an item (add sources) | — | ✓ |
| Unmap products from an item (remove sources) | — | ✓ (see “When one change affects another area”) |
| Delete an item | — | ✓ (see below) |
| Create, edit and delete custom products | — | ✓ |
| Create, edit and delete custom units | — | ✓ |
Menu Costing
| What you can do | View Recipes | Manage Recipes |
|---|---|---|
| See ingredients | ✓ | ✓ |
| Create, edit and delete ingredients | — | ✓ |
| Change which product an ingredient uses | — | ✓ |
| See prep recipes and dish recipes | ✓ | ✓ |
| Create, edit, duplicate and delete prep recipes | — | ✓ |
| Create, edit, duplicate and delete dish recipes | — | ✓ |
| See modifiers | ✓ | ✓ |
| Create, edit, duplicate and delete modifiers | — | ✓ |
| Set up and change margin monitoring | — | ✓ |
| See custom products | ✓ | ✓ |
| Create, edit and delete custom units | — | ✓ |
Linking recipes to POS items is controlled by the Manage FBU Account role in Account Settings, not by the recipe roles.
Stocktake
| What you can do | Stocktake Count | Manage Stocktake | Manage Comps & Wastage |
|---|---|---|---|
| Open Stocktake and see completed stocktakes | ✓ | ✓ | — |
| Open a sheet and see its Stock Items | ✓ | ✓ | — |
| See the Stock Items list | ✓ | ✓ | — |
| Create, edit and delete sheets | — | ✓ | — |
| Add and remove Stock Items on a sheet | — | ✓ | — |
| Set up, edit and delete a Stock Item | — | ✓ | — |
| Change which product a Stock Item uses | ✓ | ✓ | — |
| Create custom counting units | — | ✓ | — |
| Start a stocktake | ✓ | — | — |
| Open a stocktake that’s in progress | ✓ | ✓ (view only) | — |
| Enter or clear counts | ✓ | — | — |
| Complete a stocktake | ✓ | — | — |
| Discard a stocktake | ✓ | ✓ | — |
| Edit a completed stocktake | ✓ | — | — |
| See Comps & Wastage records | — | — | ✓ |
| Record comps and wastage | — | — | ✓ |
| Delete a comps or wastage record | — | — | ✓ |
- Manage Stocktake can’t start or complete a count. It’s for setting things up. Give a person Stocktake Count as well if they need to set up sheets and count.
- Manage Comps & Wastage is separate on purpose. It doesn’t include access to Stocktake itself, so someone with only this role can record wastage without seeing any stocktake values. Likewise, neither Stocktake Count nor Manage Stocktake can see Comps & Wastage.
When one change affects another area
Items in the Product Hub are shared. The same item can be an ingredient in Menu Costing and a Stock Item in Stocktake. So some Product Hub actions change those areas too, and you need permission for each area they touch:
| Action in the Product Hub | If the item is used in… | You also need |
|---|---|---|
| Delete an item | Menu Costing (as an ingredient) | Manage Recipes |
| Stocktake (as a Stock Item) | Manage Stocktake | |
| Unmap the product that’s currently in use | Menu Costing (as an ingredient) | Manage Recipes |
| Stocktake (as a Stock Item) | Stocktake Count or Manage Stocktake | |
| Delete or unmap an item nothing else uses | — | Manage Product Hub only |
If you don’t have a permission you need, the action is disabled and tells you why.
Seeing prices
Supplier prices shown in the Product Hub, Menu Costing and Stocktake depend on the separate view pricing on products permission, which comes with the ordering roles. Without it, supplier prices are hidden. Your own custom product prices, recipe costs and recorded stocktake values are always visible.
Troubleshooting & FAQs
I can see a sheet but I can’t start a stocktake.
Starting a count needs the Stocktake Count role. Manage Stocktake alone can set things up and open a count that’s in progress, but not start one. See Who can do what.
I can’t see Stocktake in my menu.
Stocktake is a Premium feature and is switched on per account. Check you’re on a Premium plan, then contact support if it still doesn’t appear. Your user role also needs permission to view Stocktake.
An item says “One or more mapped products need quantities”.
Stocktake needs to know how each mapped product converts to the unit you count in. Select Set up Stock Item, enter a quantity for every product, and save. See Step 1.
I can’t find my item when adding it to a sheet.
Only items set up as Stock Items appear. Set the item up from the Product Hub first. If it’s not in the Product Hub at all, add it there.
“Add a Stock Item” is greyed out.
A stocktake is open on that sheet. Complete or discard it, then you can change the sheet’s items.
An item shows a dash (—) for Last Count or Total Cost.
It hasn’t been counted yet, or you left it blank in the last stocktake. Completing a stocktake only fills in the items you entered a quantity for.
Does recording wastage change my reports or stocktake counts?
No. Comps & Wastage is a log only. It doesn’t affect your reports, your stocktake sheets or any completed stocktake.
I recorded wastage by mistake.
Select ··· on the record in Comps & Wastage and choose Delete. Records can’t be edited, so enter a new one with the right figures.
Does a count change my Menu Costing?
No. Stocktake and Menu Costing share the same Product Hub items, but each has its own settings. Setting up an item for one doesn’t set it up for the other.